Supplier Payments/Debits/Credits Training Guide
Assumed Knowledge
Before you attempt the Supplier Payments/Debits/Credits training guide, you must complete:
The skills covered by the training guide segments listed above are taken as assumed knowledge. Do not proceed with this segment of the training guide until you have reviewed the training guide segments listed above and successfully completed the skills test at the end of those earlier training guide segments. You can't successfully complete this segment of the training guide without the skills covered in those earlier segments. There are no effective short-cuts! Don't sell yourself short by skipping those essential skills.
Supplier Payments Overview
Supplier Payment Video Training
Watch those training videos on supplier payments:
(Before using any videos, don't get stuck with viewing a tiny image, see How To Play Videos )
Entering a new supplier payment through Supplier Transactions
A supplier payment in Readysell records a payment for goods that have been purchased from a supplier. Once the payment has been entered and allocated, a supplier remittance can be sent to the supplier.
- In the navigation panel, click Relationships>Supplier Transactions>Payments
- Click New. The Supplier Payment window displays.

- Enter header details for the payment:
- Select the supplier who the payment is for.
- Enter the date of the payment. For transactions off a bank statement, this will be the statement date; for other transactions it will be today's date.
- Enter the value of the payment.
- Enter the payment tender method. The available finalisation methods will depend on what you enter here.
- Select the Bank account that the payment has been made from
- Enter a description of the payment.
- Enter a Payment Reference. Usually your account code with the supplier. If paying by cheque enter the cheque number.
When you have finished, you have five options to finalise.
- Click either Save or Save and Close to save the payment without finalising it. This can be used to park a payment.
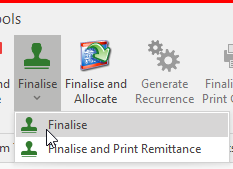
- Click on Finalise to finalise the payment without allocating it against any invoices. When you click on Finalise you can choose either Finalise or Finalise and Print Remittance.
- Click Finalise and Allocate to finalise the payment and allocate it against an invoice.
- If the payment was by cheque, you can also click Finalise and Print Cheque to finalise the payment and print a cheque if you have preprinted stationary.
Entering and allocating a Supplier Payment through Cards using 'Pay' button
Paying Existing Supplier Open Items by Tagging
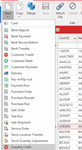
In the navigation panel, click Relationships>Cards.
- You can narrow your search by clicking on the Drop Down Box on the top panel at selecting 'Current Suppliers'
- Select "Supplier"
- Click on tab "Status tab"
- Click on tab "Supplier Open Items"
- Click on 'Unallocated Open Items' as you only want to pay transactions that are outstanding.
Hold down the Ctrl Key as you click on each individual Open item that you wish to flag to pay. As you click and highlight each open item you will notice that the '$ Value" in the Pay $ is increasing.
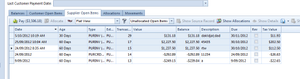
- Click on button "Pay $..." button
- Change the "Date" if required
- Select the "Tender" for the supplier payment.
- Key in the "Description" that goes with this payment
- Enter a payment reference. This is very important if using the Importing of Bank Statements. You can enter your account code with the supplier or if paying by cheque enter the cheque number.
- If you need to add further notes to the payment you must click on 'Save' and click on 'Notes' action button on the top task bar.Notes
- Click on button "Finalise" and select to either 'Finalise' or 'Finalise and Print Remittane'. If you have selected 'Print Cheque Tender' and you need to print the cheques to go with this payment if you have preprinted stationary.
- If you selected 'Print Cheque Tender' then click on 'Finalise and Print Cheque' action button
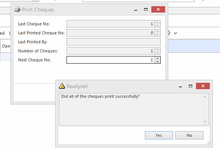
'Print Cheques' pop up box appears
- Check the details re cheque numbers etc and click on YES
- Printer Window selection window appears.
- Select the correct Printer and click on Print
- You may get a pop up saying 'One or more margins are set outside the printable area of the page. Continue?
- Click on Yes
Another Pop up will appear 'Did all of the cheques print successfully? yes or no. If they didnt you have the choice to say no and reprint the cheques. If they did click on Yes.
'Would you like to Print the Associated Remittance Advices?

- Click on OK to print the remittance or Cancel to exit.
- Printer selection will appear, select the printer and click on Print to Print the Remittance.
Entering a new supplier payment through cards manually
A supplier payment in Readysell indicates that you are paying suppliers for items that have been purchased. A payment can be made via direct deposit, cheque, eftpos or cash etc
Once a payment has been entered, it can then be allocated against the suppliers card, and it then reduces the balance owing by the supplier.
If you need to make a payment to a supplier before placing an order with them, you can insert a payment against the suppliers card and leave the payment unallocated until you receive the goods and invoice.
Once that is done, you can allocate the payment against the corresponding invoice ensuring the amount paid to the supplier equals the value of the invoice.
- In the navigation panel, click Relationships>Cards.
Find the Card and Highlight it
Right Click on the Card
Highlight NEW and Select Supplier Payment Entering a new supplier payment through Supplier Transactions
- Or from the top ribbon, drop down the NEW action button, highlight and select Supplier Payment
- The Supplier Payment window displays.
- Enter header details for the payment:
- Enter the date of the payment.
- Enter the full value of the payment to make
- Enter a description to best describe the payment usually the invoice number
- Select the correct tender method. This is very important as it affects bank reconciliations.
- Enter a reference for the payment. This reference can be your account code with the supplier or something off the bank statement. If paying by cheque then enter the cheque number
- When you have finished, you have two options.
- Click Finalise to finalise the payment without allocating it.
- Click Finalise and Allocate to finalise the payment and allocate it against an invoice. refer to more details on the allocation and applying discount on the link Entering a new supplier payment through Supplier Transactions
Test data screen shot below

Supplier early payment discount terms can be applied to a supplier payment automatically by entering the "Early Payment Discount Terms" and "Early Payment discount Percent" on the supplier setting tab.
Note: The value of the payment term that you insert into the field 'early payment discount term' applies to the 'date' of the open item not the 'due date' on the open item.
eg If you have Payment terms of 30 EOM and you have an invoice dated 1/9/2020 the due date of the invoice would be 1/10/2020.
If you insert an early payment discount term of 15 and a discount percent, that means if you pay this invoice 15 after the date of the open item and before the due date, the discount will apply.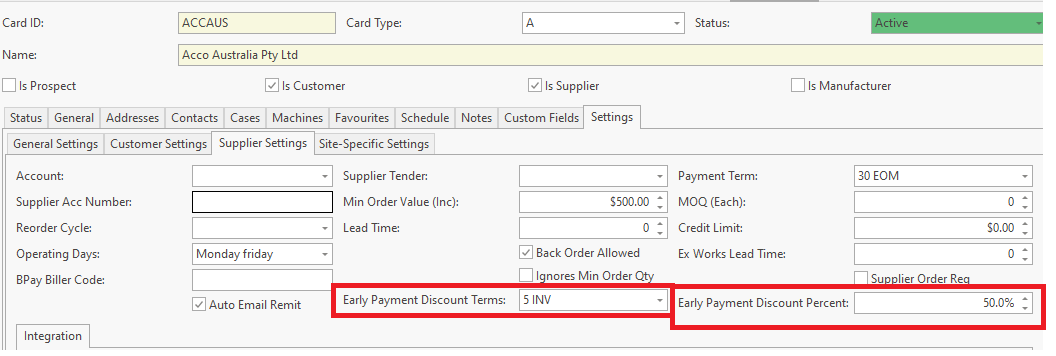
Reversing a Supplier Payment through Cards
There are many ways within Readysell of reversing a Supplier Payment.
Readysell will only allow you to reverse a supplier payment into a date that has not been reconciled. If a bank reconcilation has been extracted and posted for the date you are trying to reverse a supplier payment into, the system will pop up with a validation error. You can only choose to close. By closing, you then have the option to either enter a date that has not been reconciled to stand for the reversal or not reverse the supplier payment at all and click on Close..
You can reverse just the supplier payment and/or the supplier payment along with the allocated open items. The system will prompt you with a validation if the payment has allocations against it and you can choose to 'Ignore' or 'Close'.
If you choose to Ignore and continue with the reversal of the supplier payment, the system will create a reversal supplier payment and set all the open items allocated against the supplier payment to be outstanding.
When reversing just a supplier payment, the system creates a supplier payment in reversal and writes 'Reverse' in the description field and allocates the original payment to the reversed payment.
- In the navigation panel, click Relationships> Cards
Search for the supplier cardid or card name for the payment in question.
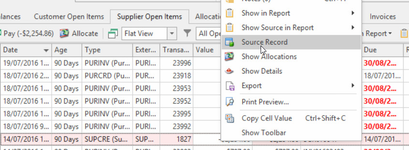
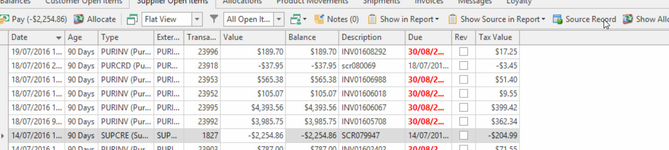
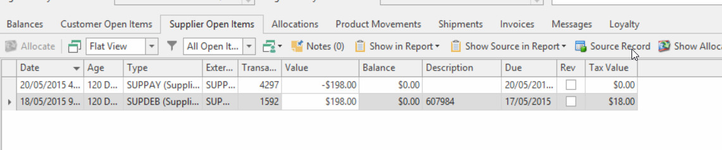
- Click on tab Status>Supplier Open Items
Drop the filter in the detail area to 'All Open Items"

- Search for the payment that you need to reverse.
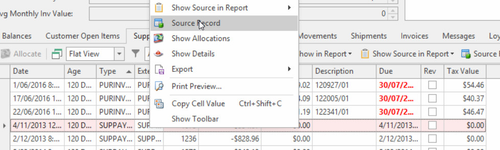
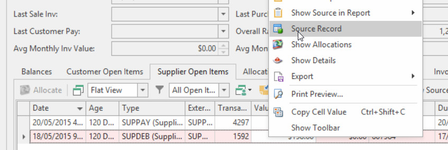
Highlight the supplier payment and either right click and select 'source record' or click on Source record in the detail area ribbon

- You will now be take to the original supplier payment window.
- Click on Reverse action button in the top ribbon
If the payment has an allocation you will get a validation error
If you wish to reverse both the supplier payment and open items that are part of this allocation, click on Ignore on the validation.
You are now prompted with a date. This will be the date for the reversal. If you leave the default date, you could get an error if this date is part of a posted bank reconciliation. Click on Ok
Validation error pop up box will appear if the date is in a reconciled period. Click on Close and decide if you still want to reverse the supplier payment or not. If you do, change the date on the reversed transaction and click on OK
By reversing a supplier payment that has allocations and dating the reversal a different date, the system creates the reversed supplier payment and allocates it against the original supplier payment and all the open items that were linked to the original supplier payment are now outstanding.
Reversing an existing supplier payment through Supplier Transactions
There are many ways within Readysell of reversing a Supplier Payment.
Readysell will only allow you to reverse a supplier payment into a date that has not been reconciled. If a bank reconcilation has been extracted and posted for the date you are trying to reverse a supplier payment into, the system will pop up with a validation error. You can only choose to close. By closing, you then have the option to either enter a date that has not been reconciled to stand for the reversal or not reverse the supplier payment at all and click on Close..
You can reverse just the supplier payment and/or the supplier payment along with the allocated open items. The system will prompt you with a validation if the payment has allocations against it and you can choose to 'Ignore' or 'Close'.
If you choose to Ignore and continue with the reversal of the supplier payment, the system will create a reversal supplier payment and set all the open items allocated against the supplier payment to be outstanding.
When reversing just a supplier payment, the system creates a supplier payment in reversal and writes 'Reverse' in the description field and allocates the original payment to the reversed payment.
- In the navigation panel, click Relationships> Supplier Transactions>Payments
Drown the Filter to show 'All Supplier Payments'

Search for the supplier payment or cardid or card name for the payment in question.
- If a payment has not been reversed, the Reverse action button will be active.
- Highlight the payment
- Click on 'reverse' action button in the ribbon
If the payment has an allocation you will get a validation error

If you wish to reverse both the supplier payment and open items that are part of this allocation, click on Ignore on the validation.
You are now prompted with a date. This will be the date for the reversal. If you leave the default date, you could get an error if this date is part of a posted bank reconciliation. Click on Ok

Validation error pop up box will appear if the date is in a reconciled period. Click on Close and decide if you still want to reverse the supplier payment or not. If you do, change the date on the reversed transaction and click on OK

By reversing a supplier payment that has allocations and dating the reversal a different date, the system creates the reversed supplier payment and allocates it against the original supplier payment and all the open items that were linked to the original supplier payment are now outstanding.
Using the Supplier Payment Discount feature on Over and Under Payments through Supplier Transactions
- In the navigation panel, click Debtors and Creditors>Supplier Transactions
Click New. The Supplier Payment window displays as below.
- Enter the header details for the payment
- Enter the date of the payment.
- Enter the full value of the payment made
- Select the Supplier from the drop-down filter and draw it to the screen
- Enter a description to best describe the payment.
- Select the correct tender method. This is very important as the tender selected affects the bank reconciliations.
Enter a payment reference. This is used when Importing the bank reconciliation. Usually, your account code with the supplier or a cheque number if paying by cheque
Test data of two supplier payments one for $10 and one for $40

- When you have finished entering the payment details you can do one of two things either:
- Click Finalise button to finalise the payment only
Click Finalise and Allocate to finalise the payment and allocate it against an invoice and use the discount feature
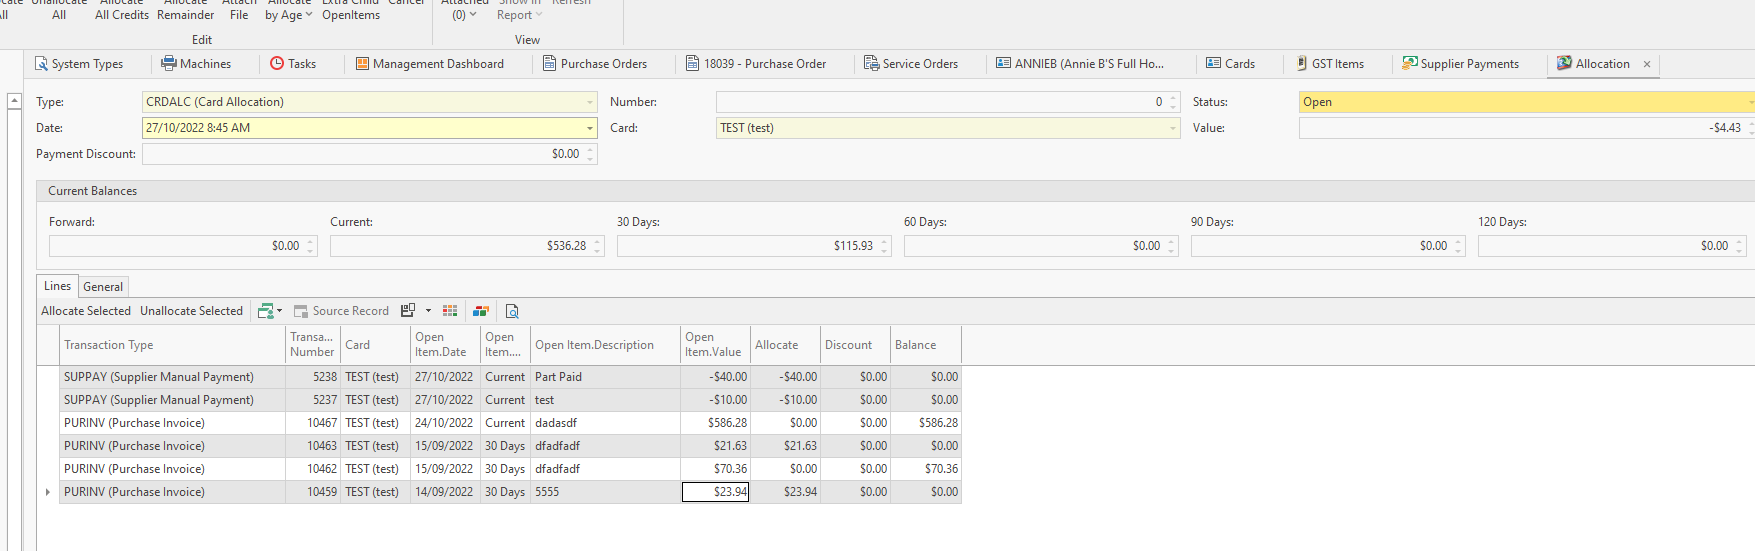
If you select Finalise and Allocate, a Supplier Payment Allocation Window will open (test data screen shot below)
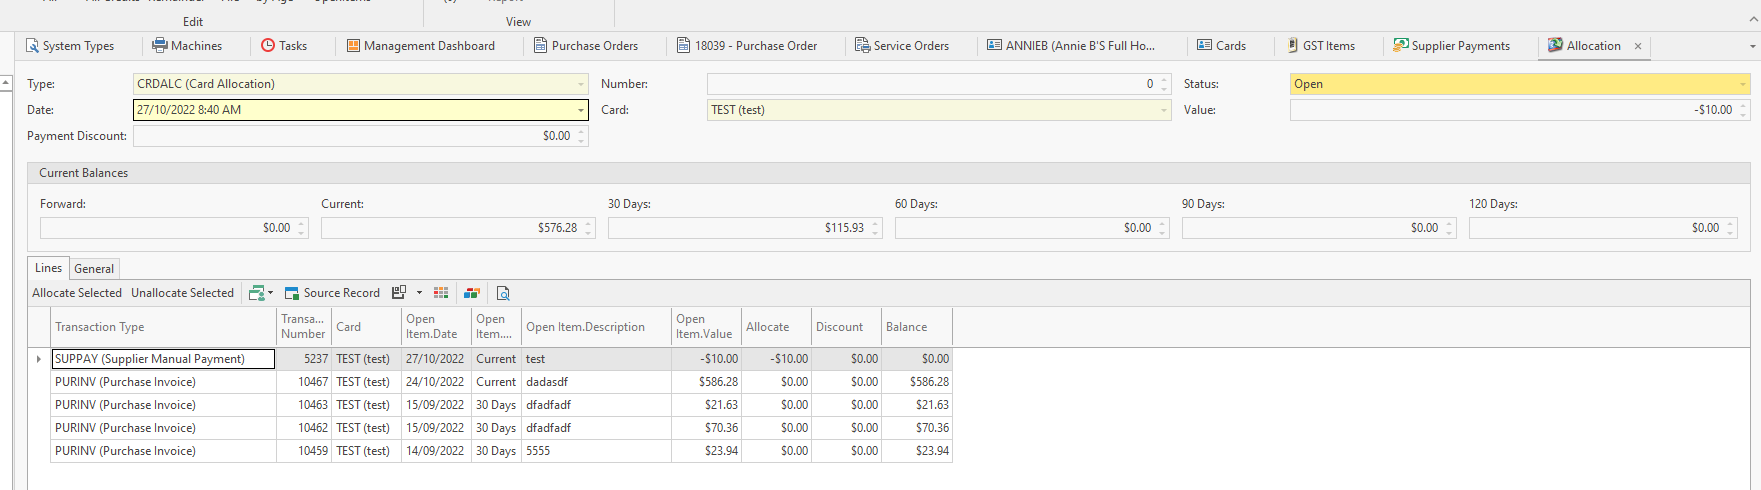
- Highlight each open item that makes up the payment and click on 'allocate selected'.
A balance will remain in the 'Value' field at the top of the allocation window depending upon if it is an overpayment or underpayment.
Overpayment:
If the balance in the 'value' field is a negative value, in the line details of the allocation for the Suppay transactiontype line, enter a Negative value into the discount field. This means that you are overpaying by a few cents and you wish to write it off at the time you enter the payment and allocate it
The balance in the value field should now be 0.00
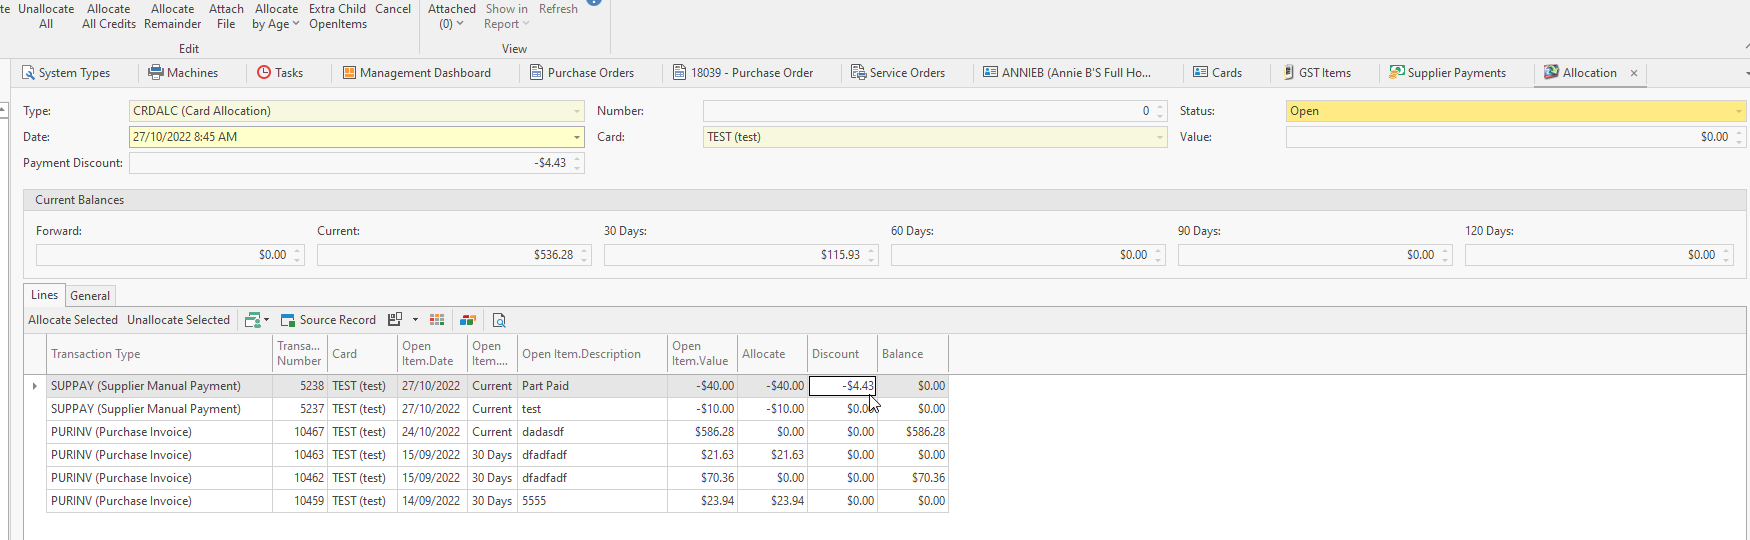
Click on Finalise
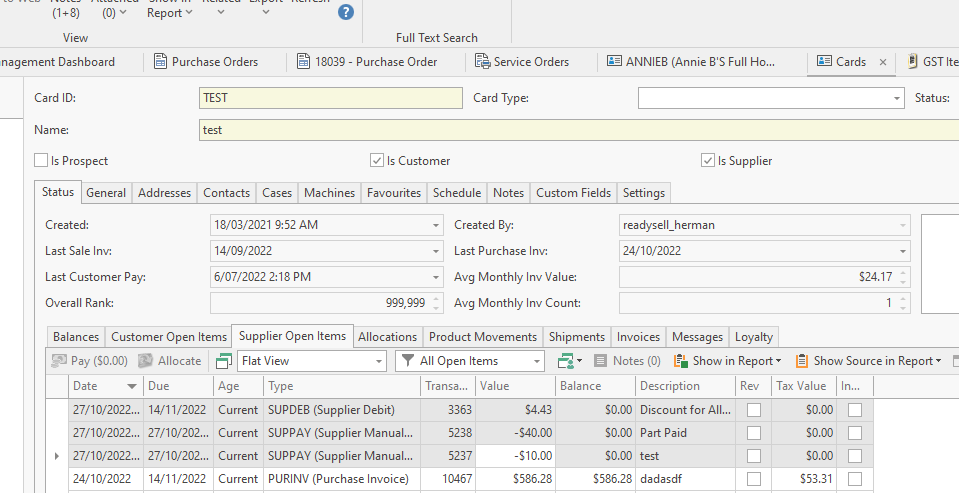
Once this overpayment has been entered and allocated with a discount value and finalised, the system will automatically create a SUPDEB on the card (Supplier debit) to stand for the discount value and it will be dissected against the general ledger account of 'Supplier Discount Received eg 62070'.
Result on the supplier card open item
Underpayment:
Follow the steps above to insert the supplier payment (full value of the payment overpaid)
When you click on Finalise and Allocate on the allocation window, select the open items that make up the supplier payment
You will be left with a balance in the value field because you overpaid. Example of test data screen shots below
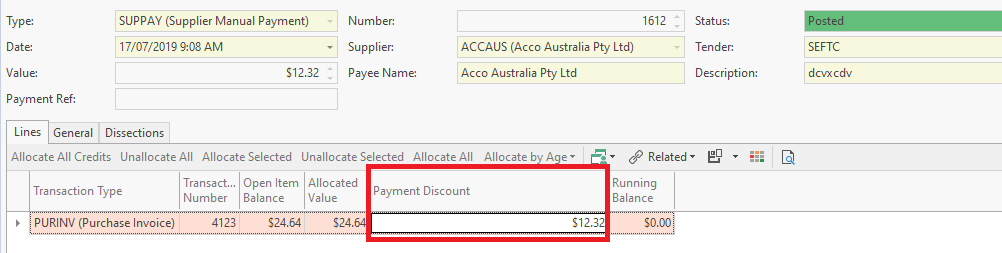
If the balance in the 'value' field is a positive value, on the line details of the allocation for the Suppay enter a Positive value in the discount field. This means that you have underpaid by a few cents and you wish to write it off at the time you enter the payment and allocate itSupplier payment $70 rounded down and Underpaid by 0.36c

Allocation and inserting the discount of the underpayment of $0.36 in the discount field on the supplier payment transactiontype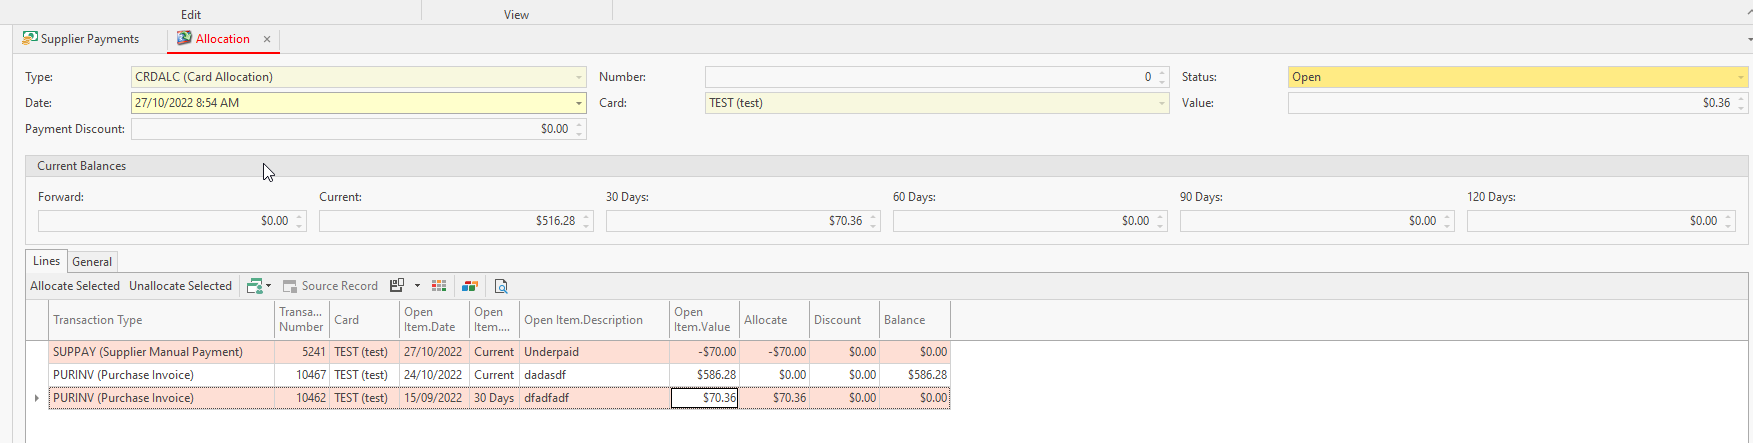
Nett result of the allocation is now $0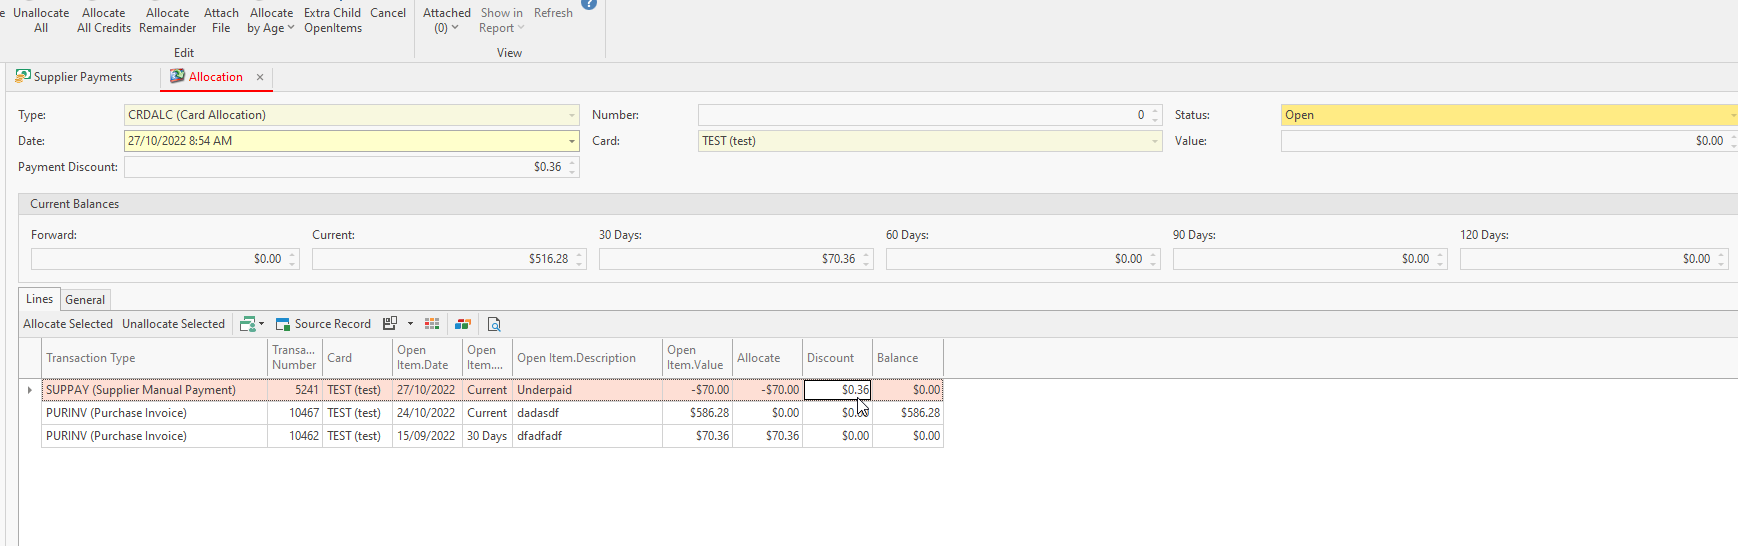
The value now should be 0.00 on the allocation window
Click on Finalise
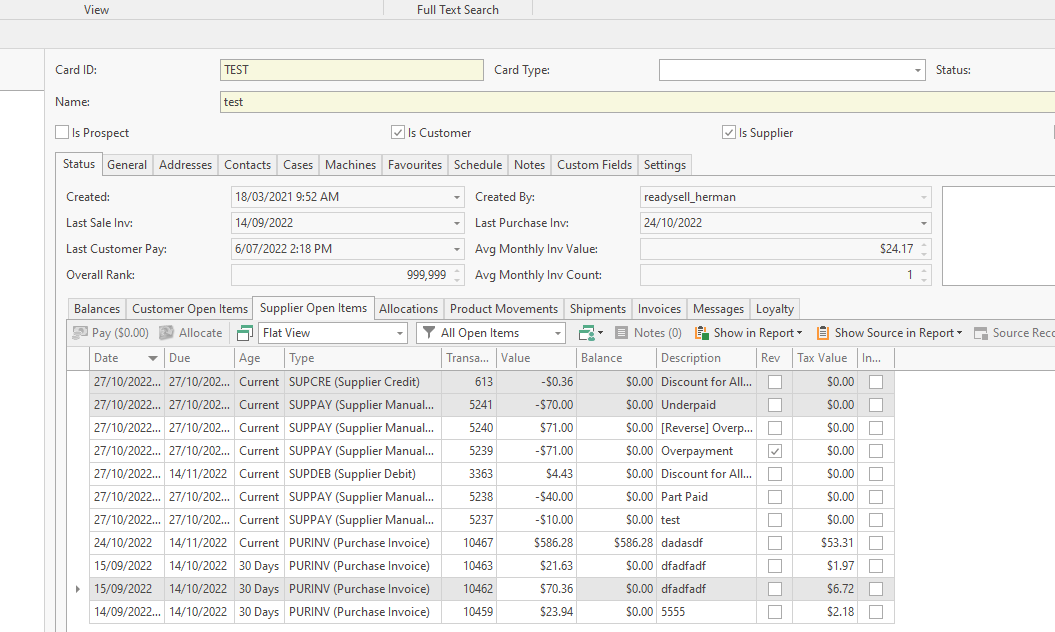
Once this underpayment has been entered and allocated with a discount value and finalised, the system will automatically create a SUPCRE on the card (supplier credit) to stand for the discount value and it will be dissected against the general ledger account of 'Supplier Discount Received eg 62070'.
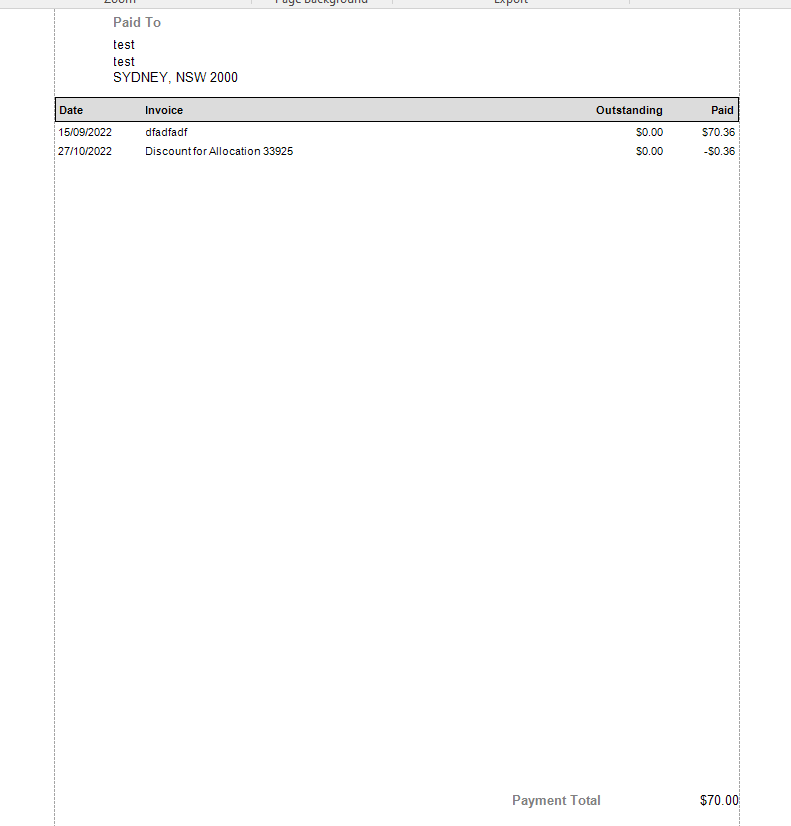
Remittance will print the value of the payment along with the open items that were allocated against the payment. If there is a transactions created to stand for the discount, that will print also.
Supplier Payment Runs Overview
You can also extract a ABA file or BPay file if you have this set up.
Generating supplier payments using a supplier payment run
You do not need to submit this payment using just the ABA file, you can manually upload the supplier payments if you dont have the ABA file set up.
If you are going to use ABA (Australian Banking Association) please ensure you follow the setup for the ABA file before you commence Payment Runs. Setting up automatic generation of ABA files for supplier payments
You may need to contact Readysell for the setup of the ABA File .
Ensure that Readysell has set up the Tenders, ABA, Bpay file before you can commence a Supplier Payment Run.
If you should have a problems with either emailing remittances and/or generating ABA file from within a Supplier Payment, DO NOT REVERSE EACH INDIVIDUAL SUPPLIER PAYMENT. Contact Readysell.
If you feel you have made a mistake with one supplier in the payment run, DO NOT REVERSE EACH INDIVIDUAL SUPPLIER PAYMENT RUN only reverse the supplier payment that does not look right or contact Readysell.
If you have overlooked or the supplier open item is not part of the payment run, go back to the supplier and check. If the transaction does not exist you can still insert the transaction as long as it has the right date and if you the payment run is still open, you can still re extract into the run and take up the transaction.
Before commencing a supplier payment run, you should have reconciled the supplier remittances against the open items in Readysell to ensure that the data is correct.
You cannot overpay a supplier open item within the run, however you can underpay and leave a balance on the open item. If the open item you wish to pay is greater than the transaction entered into Readysell you need to go back to the source transaction and fix it.
Also in respect to Supplier Credits or Purchase Credits within the payment run, they are not allocated to be paid it is up to your discretion when you want to take these credits up and in what period. They are part of the field 'Balance' but not part of the field 'Payment Value'.
If the overall supplier balance for a Supplier is in Credit for a due date that has been selected in a payment run, then this supplier will not be part of the supplier payment run. You will have to do a manual supplier payment from the suppliers card, highlighting the open items you wish to pay and allocate accordingly.
If you wish to see all outstanding open items for a supplier and not just the open items due to be paid, set the due date on the supplier payment run to be a date in the future.
Supplier Card data tidy up
- Supplier Account Number within the Supplier Settings Tab on each Supplier Cardid
- Assign a Payment Term within the Suppliers Settings Tab
- Set a Supplier Tender within the supplier settings tab
- If you are going to email the supplier the remittance, within Supplier Settings Tab, turn the Tick on for 'Auto Email Remit' and also from within Contacts tab> a contact name, email address, job description, ‘is receivable’ ticked – if you wish to email the remittance.
- On the Address tab, ensure at least one address is flagged as 'Accounts'.
- If you are using the ABA file to pay the supplier check all set up have been done. see link Setting up automatic generation of ABA files for supplier payments
- If you are using the Bpay file to pay the suppliers check all set up has been done. See link Setting up automated generation of Bpay Supplier payments.
- Ensure that Readysell has set up a Tender to stand for the Supplier Payment via ABA or Bpay or just EFT. Do not just select any tender.
Supplier Payment Run
- From the Navigation panel, double-click Relationships>Supplier Transactions>Payment Runs
- Check that there are no outstanding payment runs by dropping the filter in the ribbon and selecting Outstanding Payment Runs. If there are you will need to finalise it.
- Then click New to create a new payment run
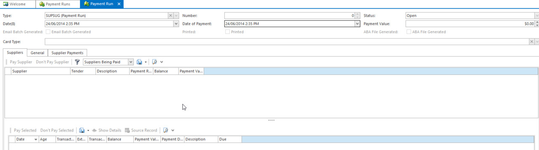
- The New Payment Run window appears
Check the Payment date. If you are not lodging the payment today you can change the date to reflect when you are actually going to transfer the money
Click Extract Open Items.

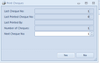
Extract Open Items pop up box will appear
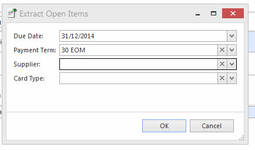
- Enter Due Date. That is the further due date for all invoices to be paid. The system will look at anything with a due date less than or equal to the date you enter. Eg if you wish to pay all supplier invoices for March that have a payment term of 30 end of month, then the due date on these invoices will be 30th april or 1st may.
- If you wish to narrow your critera down, you can enter a Payment Term and/or One Supplier and/or One Card Type otherwise leave these fields blank to extract all Open items due for payment
Click on OK to continue.

- A list of suppliers will appear on the screen.
Summary in the header area and detailed open items list for each supplier further down Ensure you are on the filter in the detail area of ‘All suppliers’
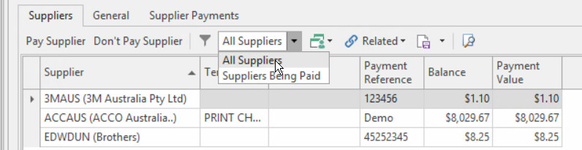
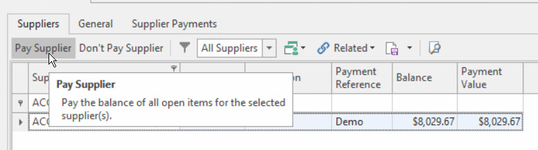
- Suppliers and Payments can be marked as Pay or Don't Pay.
The easiest and quickest way to maintain a very large list extracted for payment would be to highlight all the suppliers in the details list view and click on 'Don't Pay Supplier'.
This flags all the open items in the list to have a payment value of 0.00.
If the list is very small you don't have to do this, you can go through each supplier and manually work out what needs to be paid and not paid.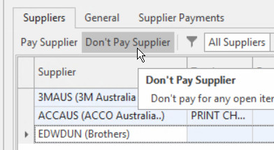
- Now add a search filter to your list view by following the steps below so that you can search for each supplier. Easier to set up a view variant to suit your needs View Variants Button
Right click on any field heading and select ‘show auto filter’ . A search bar will appear across the entire row
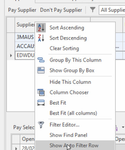
Start searching for the first supplier you wish to pay by entering part of or all of the supplier code into the Supplier field
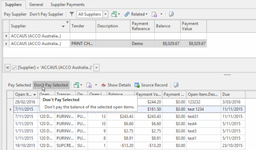
- That supplier will appear, with a header line and a list of one/or many invoices/credits that make up the item
- If you are paying the full amount owing to this supplier, click on ‘Pay Supplier’ in the header area
If you are paying only one/many or part of an invoice then work in the detail area
- Keep going by searching for each supplier that you wish to pay and mark the ones you want to pay being either the full value on the header or certain open items in the detail area.
- As you make changes to the Payment Run Work file ensure you always click on SAVE
- As you are flagging suppliers/open items for payment to the batch, the Payment Value in the top right hand side of the batch will increase.
There are two fields, Balance and Payment Value.
Balance is the sum of all the Open items owed to the supplier irrelevant of whether you have marked the open item to be paid or indispute
Payment Value, is the sum of the openitems flagged to be paid. There is a field checkbox 'Indispute'.
If this checkbox is already TICKED, that means the open item will not be part of the Payment Value but part of the Balance.
If the checkbox is not TICKED, then this open item value is part of the Payment Value and Balance.Once you are happy and think you have all the suppliers flagged to be paid, double check by changing the filter in the detail area, to be ‘Suppliers to be paid’.1.To mark a supplier open item as 'IN DISPUTE' after you extract the supplier payment run:
Find the Supplier
Highlight each open item you wish to flag as In Dispute and not be part of the Payment Value
Either manually click on the field 'Open Item.InDispute' and tick it
Click ON SAVE
OR
Highlight each open item, click on the action button 'Show Details'
Turn the tick on for each of the open item
Click on SAVERemember to constantly click on SAVE for any change made to the supplier payment run
2.To unmark a supplier open item that is 'IN DISPUTE' after you have extracted the supplier payment run:
Find the Supplier
Highlight each open item you wish to turn off the 'In Dispute' checkbox
Either manually click on the field 'Open Item.InDispute' and turn the tick off
Click ON SAVE
OR
Highlight each open item, click on the action button 'Show Details'
Turn the tick off for each of the open items
Click on SAVERemember to constantly click on SAVE for any change made to the supplier payment run
Once you have done this for all suppliers, you must RE-Extract the same supplier payment run and click on SAVE.
Check that the Full Payment Value equals your manual worksheet or statement
Ensure to always click on SAVE as you make changes within the payment run. It is like an excel worksheet being maintainedNow Click Set Payment Defaults. Here the system will allow you to fill in the tenders, description and payment reference that are blank on the supplier payment run batch

Set Payment Defaults pop up box appears
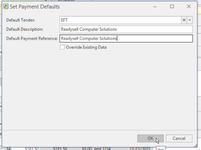
Select the main tender to be used eg EFT
Enter your Company name maybe in the Default Description
Enter your Company name maybe in the payment reference
Leave Blank ‘Override existing data’ do not turn this on
This means that where for a supplier within the batch, there is no tender, no description and no payment reference, what you have entered will populate onto the batch run
Click on OK.- Now Click on SAVE
- You can change the tender, the description and payment reference on any one of the suppliers if you need to
- Click on SAVE
Check the payment run once more before you click on Generate Payments
- Click Generate Payments. This will generate the Payments to the Suppliers account and post the payment run.
You are now warned that you are going to generate a payment for each supplier marked as pay. Click on Yes to continue or no to go back to the batch and make changes

- Click on Refresh until the Status on the Batch changes from Posting to Posted
When the status changes to Posted, the Action buttons in the top ribbon become available for the next steps, that is email batch/print remittance and generate aba file.

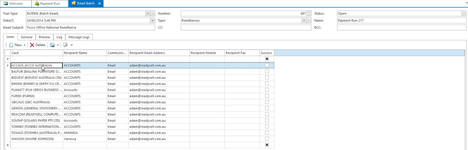
Next Click on Generate Email Batch This will email all remittances to suppliers that have been setup with an email address correctly on the card contact

Ensure beforehand that all suppliers within the batch, have a contact with an email address and ‘Is Receivable’ check box is on for that Supplier if you wish to email the remittance .
Also ensure that on the settings tab within the supplier card the check box of ‘auto email remit’ is ticked otherwise that supplier will not be part of the email batch and you will need to print the unemailable remittances.- A window appears with a list of all the Suppliers you are about to email
You can add or change the ‘Email Subject’
You can change/remove the CC
You can change/remove the BCC
You can change the Default name
Then click on Save- Check the suppliers listed in the batch
If a supplier appears more than the once and you don’t want to send out more than 1 remittance, firstly go to the suppliers card and tidy up the contacts. Then go back to the email batch highlight the one contact you don’t want to email and click on ‘Delete’ in the detail area and then click on SAVE.
Have a glance and make sure no email addresses within the batch look silly.
Do that for all suppliers in the list ensuring to click on SAVE once you are happy with the end result of the email batch.Click on the button Run Batch Now to generate and email the remittances out.

The tab of ‘Log’ in the detail area will open with the status of the email batch reading ‘Posting’
The email batch will display a log message of ‘starting remittances email batch run
When the emails have finished sending a message will appear in the log ‘remittance email batch completed.’ And the status on the email batch flips to Posted
Close out of the email batch run and go back to the Payment Run
- If you have suppliers not set to email you have the choice to print these or even print all remittance
Drop Down the ‘Print Remittances’ and make your choice
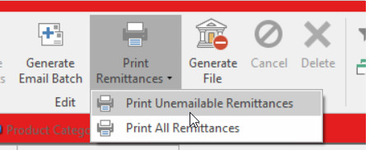
The Remittances will preview to screen.
Print them off if you haven't emailed them or the supplier has not been set to auto email remittances.
Close out once doneIf you are using the ABA file Generation the next step is to click on ‘Generate File’.
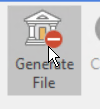
Ensure that the Suppliers cards , have the payee name, BSB and Bank Account set up with the ‘Primary Supplier Account’ tick on. If you don’t you can still do this whilst the batch is open.
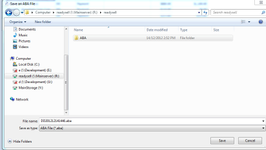
Ensure that Readysell has been set up for the ABA settings first.A window will open with where the ABA file is to be saved. You can change the name of the File if you wish and click on Save
Next log onto your bank account and follow the steps to upload the ABA file that you have just saved.
If you don’t use an ABA file upload then ignore this step and manually log onto your bank and manually enter the suppliers details etc that you are paying.
The system will open with a window to save the ABA file to.
Find the Folder called 'ABA' on the r:\Readysell\ABA normally
Save the ABA file and note down the aba number
Next is to log onto the Internet onto your bank account and Upload the ABA file that was just generated and saved
Learn more
Supplier Credits Overview
Entering a supplier credit through supplier transactions
A Supplier Credit is a miscellaneous credit that has no affect on increasing the physical stock on hand.
It is purely an expense transactions eg Rebate received, supplier discount allowed.
If stock is returned to the supplier you must handle this through the purchase order or receipts modules as a stock credit request.
If you choose to use the GST Correct action button please ensure that this is only used for a very small rounding variance in respect to tax value variance.
If the supplier has issued you with a financial credit that has been partly charged tax and the remainder not charged tax, then work out the taxable amount, insert that with the correct tax code then add another line for the non taxable value with the correct tax exempt code
- In the navigation panel, click Relationships>Supplier Transactions.
- Click Credits.
Click New. The New Supplier Credit window opens.
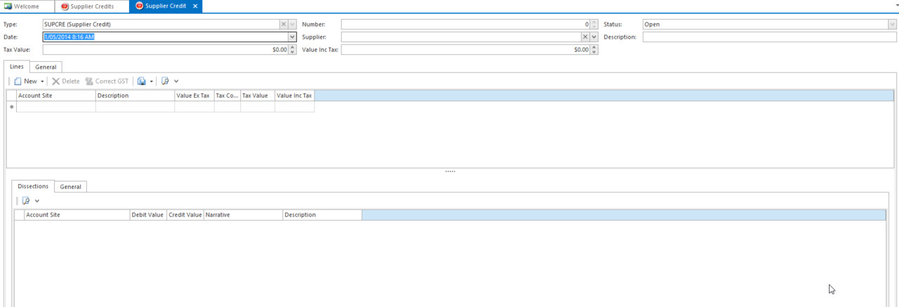
- Enter header details for the credit:
- The date is automatically set to today's date, but you can change it if you need to
- Select the supplier who the credit is for.
- Enter a description for the credit.
- In the Line Items details enter the following:
- For the Account Site, select the correct General Ledger Account .
- Enter the Value Inc or Ex and the correct tax code.
- If the Credityou are entering has partial items with GST and the other items are exempt, please ensure that you work out the value that is taxable and the value that is not taxable and insert two lines with the correct GST Tax Code and Tax Value.
- If desired, enter a different description at this level.
- When you have finished, finalise the transaction:
- Click Finalise to finalise the credit without allocating it.
- Click Finalise and Allocate to finalise the credit and allocate it against an invoice. If the finalise and allocate action button is greyed out that would be because there are no outstanding open items to allocate against on this card.
- Click Finalise and New to finalise the credit without allocating it, and start another transaction.
- If you want to add a note for the credit, you must finalise the supplier credit firstly then click on Note in the ribbon
Entering a supplier credit through Cards
A Supplier Credit is a miscellaneous credit that has no affect on increasing the physical stock on hand.
It is purely an expense transactions eg Rebate received, supplier discount allowed.
If stock is returned to the supplier you must handle this through the purchase order or receipts modules as a stock credit request.
If you choose to use the GST Correct action button please ensure that this is only used for a very small rounding variance in respect to tax value variance.
If the supplier has issued you with an financial credit that has been partly charged tax and the remainder not charged tax, then work out the taxable amount, insert that with the correct tax code then add another line for the non taxable value with the correct tax exempt code
.
- Log onto Readysell> Relationships>Cards
Drop down the New action button in the ribbon and highlight 'Supplier Credit'
- Todays date will default however you can change this to be the date required
- The supplier cardid is drawn
- Enter into the description field something that describes why you are inserting the credit eg Credit note number from the supplier
- On the line level select the General Ledger Account to stand for the credit
- Either leave the default descrption or change it
- Enter either the Value Inc or Value Ex and the tax code = INP or FOA
- Check the header value lines up to the value of the credit.
- If the credit you are entering has partial items with GST and the others exempt, please ensure that you work out the value that is taxable and the value that is not taxable and insert two lines with the correct GST Tax Code and Tax Value.
- Click on Finalise or Finalise and Allocate.
Reversing an existing supplier credit through cards.
- Log onto Readysell> Relationships>Cards
- Drop the filter in the top ribbon to select 'Current Supplier' or 'All cards'
- Search and highlight the supplier in question
- Click on the tab Status>Supplier Open Items
- Ensure you are on the filter 'All open items'
- Search and highlight the supplier credit
Either right click on the open item and select 'source record' or click on 'source record' button in the detail ribbon
The supplier credit window opens.
- Click on Reverse action button in the ribbon.
- The date window opens with the current date. Either click on OK to accept the current date or change the date to a period that is open.
- The system will created a reversal supplier credit and allocate the original credit against the reversal credit flagging the original credit as reversed.
Handling of Supplier Rebate Received
Overview
Readysell has asked a number of accountants for advice on how to handle supplier rebates. We have received conflicting advice. Some advising us to handle rebates as other income, some advising us to handle rebates as a reduction in cost of goods sold. Readysell can't advise on accounting matters and particularly can't advise on this matter. The procedure below is one way of handling supplier rebates. Please seek advice from your accountant about the procedure you should use. Readysell takes no responsibility for the approach below.
What ever approach you use should be consistent:
- If you regard supplier rebates as other income by posting the effect of the supplier rebate the other income account, then the GST code should be GST, as sales have GST. The GST item will increase the GST received
- If you regard supplier rebates as a reduction in cost of goods sold, then the GST code should be INP, (if the goods being rebated had gst on them), as transactions creating the stock used in cost of goods sold, purchase invoices for example, have a GST code of INP. The GST item will reduce the GST Paid
The amount and timing of tax you pay the tax office should be the same under both approaches. The way your BAS report figures are broken up will vary.
Speak to your accountant for further advice.
Forms of supplier rebate
A supplier rebate can be received in the form of two things:
- Supplier Refund either via a cheque or direct deposit into your bank account
OR - Supplier Credit Note only
Handling of a Supplier Refund if you receive a form of Money - 2 Methods:
Method 1:
Firstly you need to account for the Rebate and secondly the actual Refund of Money Received
If the supplier is set up as a card then follow the steps below:
- Log onto Readysell
- Select Relationships
- Select Supplier Transactions
- Select Supplier Credit
- Click on New
- Enter the date that the deposit was made onto the bank statement onto the supplier credit
- Select the Supplier Card
- Enter into the description field something like 'Supplier Rebate Received'
- On the line level select the General Ledger Account to stand for the Supplier Rebate Received
- Either leave the default description of change it
- Enter either the Value Inc or Value Ex and the tax code = INP or GST (seeing warning - based upon where in the chart your rebate received general ledger account resides)
If you use a general ledger account that is cost of goods sold your tax code should probably be "INP" as tax relates to a input to your business. If you use an other income account, your tax code should probably be "GST" as tax relates to other sales income you are recoginsing. Speak to your accoutant for further advice.
- Check the header value lines up to the value of the deposit.
- Click on Finalise

Now to account for either the Deposit received or cheque received onto the supplier account.
Log onto Readysell
Select Relationships
Select Supplier Transactions
Select Supplier Payments
Click on New
Enter the date that the deposit was made onto the bank statement onto the supplier payment
Select the Supplier Card
Enter into the description field a reference off the 'supplier rebate received' and maybe the cheque no
- Into the Payment Reference field, enter something off the Bank Statement or the cheque number
Enter the value in BACKWARDS with a MINUS Sign in front of it EG $-110 (as the supplier if depositing money into your account)
Click on Finalise and Allocate
Allocate the backwards supplier payment against the orgiinal supplier credit. Finalise and allocate button

Method 2:
If you dont have a supplier set up and you have received the rebate in the form of money being either a direct deposit or a physical cheque follow steps below:
Entering a bank Payment backwards to stand for the supplier rebate received if the Supplier Rebate Account is a form of COGS otherwise you can enter a bank deposit if the Supplier Rebate Account is set up as a form of Income.
Speak to your accountant for further advice.
Ensure that on the Supplier Rebate Received General Ledger account that the transaction type of CBKPAY Maintaining GL Accounts, Tenders and Tax Codes to Transaction Types
Log onto Readysell
Select Financials
- Select Cashbook
Select Bank Payments or Bank Deposit ( based upon where in the chart your rebate received general ledger account resides)
Click on New
Enter the date that the deposit appears on the bank statement
- Select the correct tender
- Select the bank account that the deposit is being made into
Enter into the description field a reference off the 'supplier rebate received' and or if you have a maybe the cheque no
- Into the Payment Reference field, enter something off the Bank Statement or if a cheque was received the cheque number
On the line level , select the General Ledger account for 'Supplier Rebate Received' and Enter the value in BACKWARDS with a MINUS Sign in front of it EG $-100 (as the supplier is depositing money into your account) if you are considering it a COGS if it is a form of Income just enter the value with no sign.
Click on Finalise.

Handling a Supplier Rebate if you only receive a Credit Note
- Log onto Readysell
- Select Debtors and Creditors
- Select Supplier Credit
- Click on New
- Enter the date that that appears on the Credit Note
- Select the Supplier Card
- Enter into the description field something like 'Supplier Rebate Received and the Credit note Number'
- On the line level select the General Ledger Account to stand for the Supplier Rebate Received
- Either leave the default description of change it
- Enter either the Value Inc or Value Ex and the tax code = INP or GST (seeing warning -based upon where in the chart your rebate received general ledger account resides)
- Check the header value lines up to the value of the deposit.
- Click on Finalise
Supplier Debits Overview
Supplier Debits
Entering a Supplier Debit through Cards
Supplier Debits are purely Expense/Service type transactions that have no affect on physical stock on hand eg a telephone bill, water rates, internet services etc.
If stock is received it should be entered through the Purchase order/Receipting/Invoicing module not through cards as a Supplier Debit.
If you choose to use the GST Correct action button please ensure that this is only used for a very small rounding variance in respect to tax value variance.
If the supplier has issued you with a financial invoice that has been partly charged tax and the remainder not charged tax, then work out the taxable amount, insert that with the correct tax code then add another line for the non taxable value with the correct tax exempt code.
Data Tidy ups for Debits and Credits
- On each supplier card try and get your account code with the supplier and insert it into cards>settings>supplier settings>supplier Acc Number
- On each supplier if the payment tender is always the same please assign it to the supplier card>settings>supplier settings>supplier tender
- On each supplier check the payment term supplier card>settings>supplier settings>payment term
- On each non stock supplier, apply a general ledger account for whatever the expense maybe . At the time you insert the supplier debit and drawer the supplier cardid, this general ledger account will default. The general ledger account can be changed when inserting a debit/credit note from the default account assigned to the supplier cardid. Supplier card>settings>supplier settings>account
Procedure
- Log onto Readysell>relationships>cards
- Drop the filter in the top ribbon for 'Current suppliers' or 'all cards'
- Search and highlight the supplier
- Down arrow on the 'New' action button in the top ribbon and highlight Supplier Debit
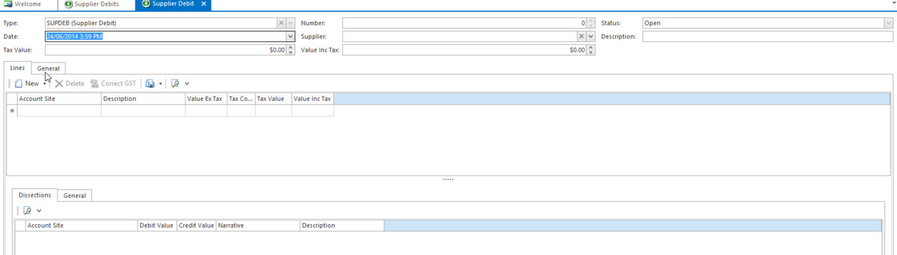
- Supplier debit window appears
- Todays default date will appear, you can change it if need be date on the invoice
- Check the cardid on the screen
- Enter a decription to best describe the debit
- On the Lines detail if you have the General Ledger account assigned to the card, it will draw to the screen. If you dont then search and select the appropriate general ledger expense account
- Enter the value ex or value inc and the appropriate tax code
- If the Invoice you are entering has partial items with GST and the other items are exempt, please ensure that you work out the value that is taxable and the value that is not taxable and insert two lines with the correct GST Tax Code and Tax Value.
- Click on either 'Finalise' or 'Finalise and New'.
Entering a Supplier Debit through Supplier Transactions
Supplier Debits are purely Expense/Service type transactions that have no affect on physical stock on hand eg a telephone bill, water rates, internet services etc.
If stock is received it should be entered through the Purchase order/Receipting/Invoicing module not through cards as a Supplier Debit.
If you choose to use the GST Correct action button please ensure that this is only used for a very small rounding variance in respect to tax value variance.
If the supplier has issued you with an invoice that has been partly charged tax and the remainder not charged tax, then work out the taxable amount, insert that with the correct tax code then add another line for the non taxable value with the correct tax exempt code.
Data Tidy ups for Debits and Credits
- On each supplier card try and get your account code with the supplier and insert it into cards>settings>supplier settings>supplier Acc Number
- On each supplier if the payment tender is always the same please assign it to the supplier card>settings>supplier settings>supplier tender
- On each supplier check the payment term supplier card>settings>supplier settings>payment term
- On each non stock supplier, apply a general ledger account for whatever the expense maybe . The general ledger account can be changed when inserting a debit/credit note. Supplier card>settings>supplier settings>account
- In the navigation panel, click Relationships>Supplier Transactions> Debits.
Click New. The New Supplier Debits window displays.
- Enter header details for the debit:
- The date is automatically set to today's date, but you can change it if you need to.
- Select the supplier who the debit is for.
- Enter a description to best describe what the debit relates to.
- Click down onto the Lines tab.
- Enter line information:
- For the Account Site, select the appropriate GL Account expense account
- Enter the value inc or Ex and the correct tax code.
- If the Invoice you are entering has partial items with GST and the others exempt, please ensure that you work out the value that is taxable and the value that is not taxable and insert two lines with the correct GST Tax Code and Tax Value.
- When you have finished, you have three options. (A pop up box may appear requesting mandatory fields)
- Click Finalise to finalise the debit without allocating it.
- Click Finalise and Allocate to finalise the debit and allocate it against an invoice. If this action button is Greyed out then there is nothing outstanding to allocate it against on that card.
- Click Finalise and New to finalise the debit without allocating it, and start another transaction.
- If you want to add a note for the debit, the transaction must be finalised and a transaction number be assigned to the supdeb. Then click Note in the ribbon and add your note.
Reversing an existing Supplier Debit through Supplier Transactions
- In the navigation panel,click Relationships>Supplier Transactions> Debits.
Search for the supplier debit or supplier cardid in question
- Highlight it
- Click on the Reverse Action Button in the ribbon
You may get a validation error warning that the 'Supplier window that the The system will pop up with a Reverse Transaction Date Window

- You can leave the date if you wish or change the date and click on OK
- The system will create a Reversal Supplier Debit and Allocate it against the Original Supplier Debit.
Reversing a Supplier Debit through Cards
A Supplier Debit is a miscellaneous debit that has no affect on decreasubg the physical stock on hand.
It is purely an expense transactions eg telstra bill, internet invoice, software charges etc
If stock is received from a supplier you must handle this through the purchase order/receipts/invoicing modules .
- Log onto Readysell> Relationships>Cards
- Drop the filter in the top ribbon to select 'Current Supplier' or 'All cards'
- Search and highlight the supplier in question
- Click on the tab Status>Supplier Open Items
- Ensure you are on the filter 'All open items'
- Search and highlight the supplier debit
Either right click on the open item and select 'source record' or click on 'source record' button in the detail ribbon
The supplier debit window opens.
- Click on Reverse action button in the ribbon.
- The date window opens with the current date. Either click on OK to accept the current date or change the date to a period that is open.
- The system will created a reversal supplier debit and allocate the original debit against the reversal debit flagging the original debit as reversed.
Learn more
Refer to the "Supplier Credits" section of the Readysell User's Guide to learn more
Cards Overview
Key Features
Cards are used to keep track of information about an organisations that are of interest to your business. Some of the key information on cards include address and contact information, as well as settings about how transactions for the card are used within Readysell. Transactions use cards to identify the customer or supplier details where required. Cards control the flow of transactions and display the balances and open items that result from transactions.
Cards can be either customers, suppliers, manufacturers, prospects or any combination of these:
- A customer is a person or company to whom you have supplied goods for payment.
- A supplier is a person or company from whom you have purchased goods on credit.
- A manufacturer is a person or company that produces goods.
- A prospect is an organisation with which you want to build a future customer relationship.
- A contact is a card that is not flagged as being a customer, supplier, prospect or manufacturer.
For Office Brands stores:
Customer cards can automatically send up to Org Admin/Web Admin using the button Send To Web (whether it sends only to Org Admin or both Org Admin and Web Admin will depend on what settings your store has with Office Brands/your website.
If you have "auto approval " turned on, it will go straight into Web Admin
if you have "manual approval", you'll need to approve through Org Admin
Salesperson.
There are two ways of reporting on a salesperson.
You can report on the Sales Person that was active at the time the sale was completed. The name of this field is 'Sales Person'.
You can report on the salesperson currently on the card irrespective of whether you have changed it or not. The name of this field ' Customer Primary Sales Person.
Creating a new supplier
Procedure
- In the navigation panel, double-click Relationships, then click Cards.
Click New to create a new card. The Card Details screen will display.
If you are creating a supplier that is similar to an existing card, you can use the Copy option to copy some of the existing card's details.
- In the top section of the Card Details screen, enter background details for the card:
Card ID
If you are part of the Office Brands group then ensure that you use the Supplier Card Ids from the Data Portal.
You can download a spreadsheet to identify the supplier card ids from either the Data Portal or your price book.- Card Type- this is optional
- Status- there is no need to changed the field
- Enter customers Name.
- Tick Is Supplier to mark this card as a supplier.
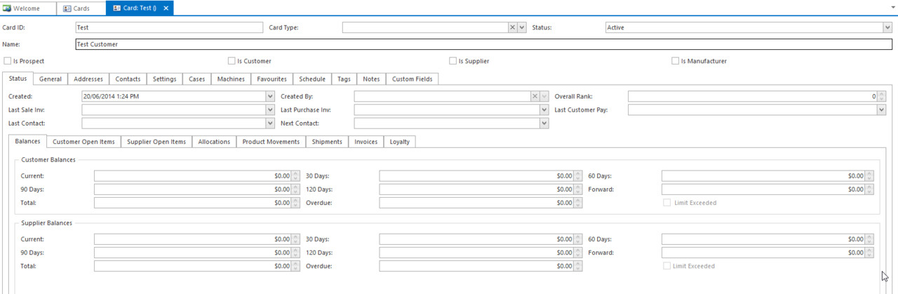
- Click on the Status tab.
- Fill in the following fields as necessary:
- On Stop: if On Stop is flagged, any purchase orders placed for this supplier will automatically be put on hold; it then requires a user with appropriate permission to release the order.
- Account Closed: if this is flagged, the supplier will not be visible when placing purchase orders, supplier misc debits, misc credits or payments. You should not have to do this for new suppliers.
- Enter Last Sale Invoice- Optional
Enter Last Purchase Invoice Date- Optional
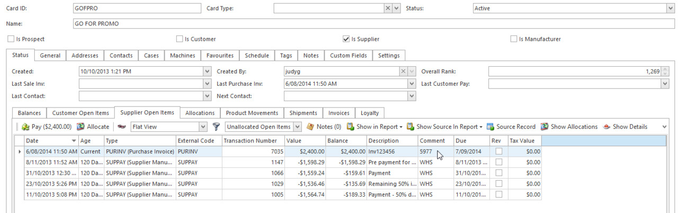
- Use Column Chooser to add column name Comment to the Status tab display layout
- Comment can be configured via system reference PURCHASE-INVOICE-OPEN-ITEM-COMMENT of the Purchasing system type to display one of the following
- Site
- Purchase Order Transaction Number
- Purchase Receipt Transaction Number
- Assign the system reference to the required property e.g. PurchaseOrderTransactionNumber.
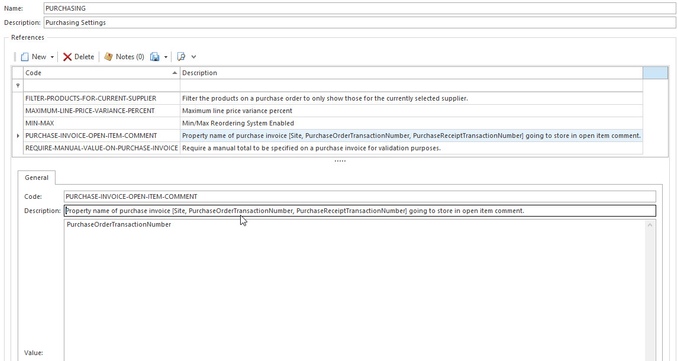
- Use Column Chooser to add Comment column to the Status tab.
- Comment column will display the value of the system reference property assigned above e.g. 5977 is the purchase order transaction number
- Note that the displayed value is persistent i.e. the value is bound to the property assigned at the time
- Click on the General tab.
- Fill in the following fields as necessary:
- Enter Trading As- Optional
- Enter ABN for the company- Optional
- Select Parent
- Click on the Bank Accounts tab, should you have the supplier's bank account details.
- Enter bank account details as follows:
- Click New to create a new account.
- Enter the payee name, BSB and account number.
If this is the supplier's primary account, check Supplier Primary Account.
Repeat this process for as many bank accounts as you wish to add. See Card bank accounts for more information on adding bank accounts.
- Click on the Addresses tab.
- Enter address details for the supplier as follows:
- Click New to create a new address.
- In the Name field, enter the supplier's name.
- In the Street 1-4 and Suburb fields, enter the supplier's address details.
- Check the purpose of this address: Accounts, Delivery, Physical or Postal. An address can have more than one type.
- Repeat this process for as many addresses as you wish to add.
- Click on the Contacts tab.
- Enter contact details for the supplier as follows:
- Click New to create a new contact.
- Enter Name of person
- Enter Job Description for the person
- Enter their Web ID- optional
- Enter the Phone, Mobile, Fax and Email Address optional fields.
- Enter persons Role.
Select one of the checkboxes, specify the roles that the contact plays within Readysell.
Repeat this process for as many contact people as you wish to add. You must have at least one contact person.
- Click on the Settings tab, then the General Settings sub-tab.
- Fill in the fields as follows:
- Select Card Status- Optional
- Discount from List field does not apply to suppliers.
- Optionally, assign a Tax Code to the card.
- Available on POS does not apply to suppliers.
- Still on the Settings tab, click on the Supplier Settings sub-tab.
- Fill in the following fields:
- Select the Tender- Optional
- Select a Payment Term
- Check Back Order Allowed to allow back orders with this supplier.
- Supplier Acc Number field.
- Enter any other appropriate details. See Card settings to learn more about the fields on this tab.
Click Save to save this card in Readysell.
Card references covers details about optional tabs on this detail view including cases, machines, favourites, schedule, tags, notes and customer fields
Creating a new manufacturer
A manufacturer is a person, group or company that manufactures goods. A manufacturer in Readysell may also be a customer, a supplier, or both.
Learn more
Refer to the "Cards" section of the Readysell User's Guide to learn more.
Click New to create a new card. The Card Details screen will display.
Tip
If you are creating a manufacturer that is similar to an existing card, you can use the Copy option to copy some of the existing card's details.