Sending a new customer and new user to the website
Overview
Readysell has worked with Office Brands to make this feature available to you to make it easier in setting up new Customers and new User IDs in Readysell which will then send up to the web using the Send To Web button in Cards. This means you will no longer have to manually create this organisation in the Org Admin section, Readysell can send it up there instead on for you using that button. Whether it sends only to Org Admin or both Org Admin and Web Admin will depend on what settings your store has with Office Brands/your website.
It will send the customer details inclusive of their first contact log in and the base contract of the price level or an existing contract you've already got in the system with the price level included on it.
If you have "auto approval " turned on, it will go straight into Web Admin (as well as Org Admin)
if you have "manual approval", you'll need to user your approval steps through Org Admin
Very important!
- The Web Customer Name on the customer card (tab Settings, sub tab Customer Settings, sub tab Web Integration) must be empty - do not fill this in otherwise the Send To Web button will be greyed out.
- A contact person must be ticked as Accounts Payable and must have a first and last name, an email address and a phone number (can be the same contact person as Purchasing Officer contact)
- A contact person must be ticket as Purchasing Officer and must have a first and last name, an email address and a phone number (can be the same contact person as Accounts Payable contact)
- An address must exist, be filled in correctly with a tick of Accounts (this can be the same as the delivery address)
- An address must exist, be filled in correctly with a tick of Delivery (this can be the same as the accounts address)
Procedure
The process below is used for adding in new Organizations and their initial User:
Create your customer card and save it (Skip this line of instruction if the customer cards already exists and follow on with the instructions below)
Make sure that there is a contact with the Accounts Payable flag on in order for the email address on the Organization Details side to be filled in.
The Web ID on the User Details will fill in with the users email address regardless of what you have on the Web ID in the customer contact (as the Web ID has to be unique)
Click on button Send To Web on the ribbon

The Web customer Name field on the Settings, Customer Settings, Web Integration tab on the card itself MUST be empty or you will be unable to click on the Send To Web button to begin with.
Send card to web window opens
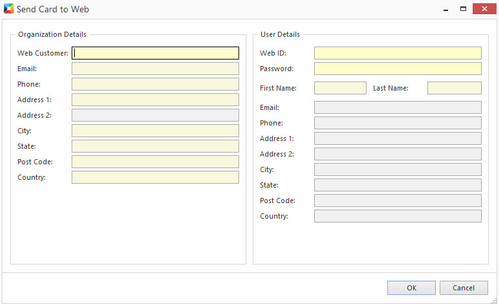
- The left hand side is for the Organization details
- The right hand side is for the User Details from the organisation
Organization Details
Organization Email and Organization Phone come from the Accounts Payable Person
Organization Address comes from the Account flag on the address
- Web Customer Name - this is what will fill in the Organization Entity Name in Web Admin. It will be auto filled in from the Customer's Name on the card you created. You can change it if required on this window to only affect what is sent to the web. It will also auto fill the Web customer Name field on the Settings, Customer Settings, Web Integration tab.
The web customer name must not contain any characters e.g. ' + & etc
It should only contain letters and numbers.
Otherwise the customer upload will fail with a reason of Y
- Email Address - this comes from the Accounts Payable ticked contact person (it must be filled in on the contact on the card)
- Phone Number - this comes from the Accounts Payable ticked contact person (it must be filled in on the contact on the card)
- Address 1 etc - this comes from the Account flag on the address (it must be filled in on the contact on the card)
- City (suburb) - this comes from the Accounts flag on the address (it must be filled in on the contact on the card)
- State - this comes from the Accounts flag on the address (it must be filled in on the contact on the card)
- Post Code - this comes from the Accounts flag on the address (it must be filled in on the contact on the card)
- Country - this comes from the Accounts flag on the address (it must be filled in on the contact on the card)
User Details
This information will only auto populate from the customer card you have set up already based on which address has this contact on it (on the Contacts tab the flag for Purchasing Officer needs to be on) and the flag turned on for Delivery on tab Addresses.
Contact Name, Contact Email, Contact Phone and Contact Web ID comes from the Purchasing Person
Contact Address comes from the Delivery Address
- Web ID for the user - this is the user id/name the person uses to log into your website - it defaults from the email address from the contact flagged as Purchasing Officer on the card. It must be a unique ID not used by any customer countrywide.
- Enter in the Password for the user - this is the password the person uses to log into your website. This one is your choice. Readysell does NOT record the password anywhere in the system and we do not recommend you recording it in Readysell at all for privacy and security reasons. You customer, at any point is able to reset their password from your website anyway so recording it may be useless anyway.
- First Name of the user - this comes from the contact flagged as Purchasing Officer on the card (it must be filled in on the contact on the card)
- Last Name of the user - this comes from the contact flagged as Purchasing Officer on the card (it must be filled in on the contact on the card)
- Email Address of the user - this comes from the contact flagged as Purchasing Officer on the card (it must be filled in on the contact on the card)
- Phone Number of the user - this comes from the contact flagged as Purchasing Officer on the card (it must be filled in on the contact on the card)
- Address 1 etc - this comes from the Delivery flag on the address (it must be filled in on the contact on the card)
- City (suburb) - this comes from the Delivery flag on the address (it must be filled in on the contact on the card)
- State - this comes from the Delivery flag on the address (it must be filled in on the contact on the card)
- Post Code - this comes from the Delivery flag on the address (it must be filled in on the contact on the card)
- Country - this comes from the Delivery flag on the address (it must be filled in on the contact on the card)
- Then click on button OK
Contract / Base contract for the price level
Once you have sent up the customer, the Office Brands Sync task will run (every 15 mins) and either send up the base contract for the customer's price level (if no other actual contract exists in Readysell for the customer) or it will send up any existing contract for the customer which will contain the customer's price level as part of that contract.
- The price level you have set for the customer must be marked as integrated to the web. (i.e. price level in Price Levels module in Readysell must have an Web Price Level ID and a Web Price Level Code)
If the price level does not have this, Readysell may not send up the price level for the contract/base contract. - If the customer is set to List pricing, the system generally does not send up a base contract. But if you have existing contracts for the customer, it will mark those contracts up to the web as List price level (1)
Checking to see if the price level was sent to the web
To look at this:
- Go to Office Brands Messages from the Navigation panel (Navigation panel > Administration > Advanced > Office Brands Messages),
- Add in the XML Data column to the screen if you do not already have this (i.e. right click on the header, select Column Chooser, select XML Data from the list, drag and drop it onto the header area),
- Filter the message type to Create update contract,
- In the xml data field search for %customercardid or web customer name,
- You can see that the price level has been sent up either as a base contract (i.e. no product pricing or category pricing listed just a price level) or as a standard contract upload.
- Check the status on it.
- If it says sent, give it a few minutes and refresh your screen for a success or failure message.
Excerpt from xml message on the right hand side of the window (once you have selected that message)

Readysell has been informed by Office Brands that depending on backlogs in the queue and the uploading of product pricing to that price level for that customer on the web side of things, it can take up to around 30mins for that price level contract to work for that customer.
Please check Web Admin for any multiple variable listings of the customer.
We have found that sometimes the same account exists on web admin a number of times with slight variations to the name.
If the customer is logging in and they are not under the organisation name the price level/contract is for, then of course they will not see the correct pricing.