Customer Payments Training Guide
- Van Ho (Deactivated)
- Sharon Harden (Unlicensed)
- Diane Partridge
- John Nairn (Unlicensed)
Assumed Knowledge
Before you attempt the Customer Payments training guide, you must complete:
The skills covered by the training guide segments listed above are taken as assumed knowledge. Do not proceed with this segment of the training guide until you have reviewed the training guide segments listed above and successfully completed the skills test at the end of those earlier training guide segments. You can't successfully complete this segment of the training guide without the skills covered in those earlier segments. There are no effective short-cuts! Don't sell yourself short by skipping those essential skills.
Customer Payments Overview
Once a payment has been entered, it can then be allocated against oustanding open items on the customer card, which it turn reduces the balance owing by the customer.
Customer Payments Video Training
Watch those training videos on Customer Payments:
(Before using any videos, don't get stuck with viewing a tiny image, see How To Play Videos )
Entering a new customer payment
If you have been paid by the Customer in the form of a Cheque, ensure that you enter the cheque bank details onto the customers card before you insert the Payment see link Card general settings
Once the Bank Details are entered onto the Customers Card, when inserting the customer payment ensure to select tender for cheque, then drop down the arrow on the field of 'Bank account' and select the cheque drawer details to the customer payment.
- In the navigation panel, click Relationships>Customer Transactions> Payments.
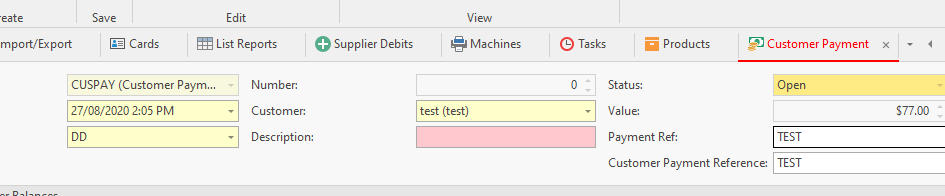
Click New. The Customer Payment window displays as below.

- Enter the header details for the payment
- Enter the date of the payment. For transactions off a bank statement, this has to be the date that is on the bank statement. For other transactions it will be today's date.
- Select the Customer from the drop down filter and draw it to the screen
- Enter the full value of the payment received
- Enter a description to best drescribe the payment.
- Select the correct tender method. This is very important as the tender selected affects the bank reconciliation.
- Payment reference if working off the bank statement has to be one full word off the statement that reflects the payment, as this will be used when Importing the Bank Statement for the Bank reconciliation.
If you receive a cheque payment then enter the Cheque number in this reference field.
- If the payment is by cheque, ensure that you add the Cheque Bank Details to the Card first off before you commence entering the customer payment. Card general settings
- When you have finished entering all the payment details at the header level, you have two options.
- Click Finalise to finalise the payment without allocating it.
- Click Finalise and Allocate to finalise the payment and allocate it against an the open items in that make up the payment
Entering and allocating a Customer Payment through Cards with 'Pay' button
Readysell has various ways on entering Customer Payments. This topic covers the quickest method of entering a customer payment is by tagging the open items for payment from within the card.
This feature of using the PAY action button is only used if the payment received is equal to the total sum of the open items highlighted in the list view. Otherwise you will need to use the Manual Entry of customer payments
If you have been paid by the Customer in the form of a cheque, ensure that you enter the cheque bank details onto the customers card before you insert the Payment see link Card general settings
Once the Bank Details are entered onto the Customers Card, when inserting the customer payment ensure to select tender for cheque, then drop down the arrow on the field of 'Bank account' and select the cheque drawer details to the customer payment
If you are using Import of Bank Statement when doing Bank reconciliations, then please ensure you enter a Payment Reference onto the Customer Payment.
The payment reference is to be one word off the bank statement. This reference is not case sensitive.
- In the navigation panel, click Relationships > Cards.
- Search for the customer either by cardid or by customer name and highlight it
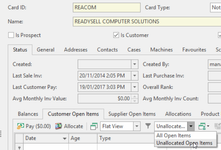
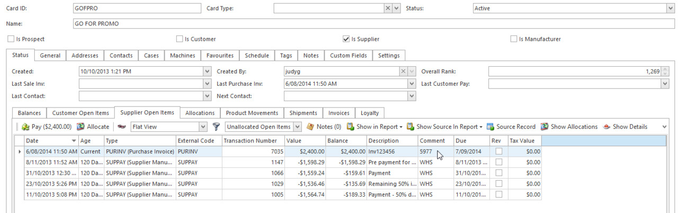
Click on the 'Status' Tab in the detail area and then click on 'Customer Open Items' tab
Show me
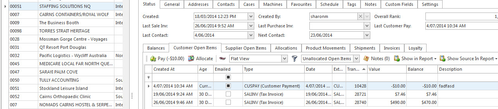
Make sure the drop down filter on the Customer Open Items is 'unallocated open items'
Hold down the Ctrl Key as you click on each individual Open item you wish to flag to pay. As you click and highlight each open item you will notice that the '$ Value" in the Pay $ is increasing.
Or if you select a range of open items, hold down the shift key on the first open item and then click on the last open item in the list , all open items in the range will be highlighted for payment.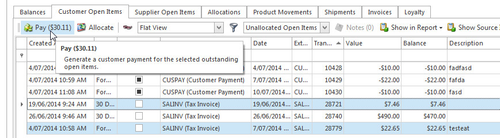
- Click on button "Pay $..." button
- Change the "Date" if required. For transactions off a bank statement, this has to be the date that is on the bank statement. For other transactions it will be today's date.
- Key in a 'Description' to best describe the payment
- Select the correct "Tender" method. This is very important in respect to when you are doing your bank reconciliation. (The tender you select will then update on the customer payment tender on the card for future payments.)
- Check the value is the total value of the payment you have received
Payment reference field must be at least one word that is on the Bank Statement. The word has to be spelt exactly as is on the bank statement and is not case sensitive.
If you receive a cheque payment enter the cheque number and ensure you select the drawer details
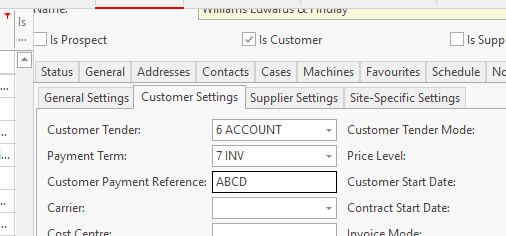
You can tidy up the customer cards by adding the reference to the field of 'customer payment reference' on the settings tab on the card or from within the customer payment , add the field of 'Customer Payment Reference' onto the customer payment window.Insert the customer reference into the payment reference field as well as the Customer payment reference field and this will pre-populate over to the card when you complete the payment.
- When you have finished entering the payment details, check that the open items in the line details are correct, which are the ones you tagged for payment are the correct open items that make up the payment.
- Click Finalise to finalise the payment and the allocation.
Entering a new customer payment through cards manually
A customer payment in Readysell indicates that a customer has made a payment for the items they have purchased. A payment can be received via direct deposit, cheque, eftpos or cash.
Once a payment has been entered, it can then be allocated against the customer card, and it then reduces the balance owing by the customer.
If you have been paid by the Customer in the form of a Cheque, ensure that you enter the cheque bank details onto the customers card before you insert the Payment see link Card general settings
Once the Bank Details are entered onto the Customers Card, when inserting the customer payment ensure to select tender for cheque, then drop down the arrow on the field of 'Bank account' and select the cheque drawer details to the customer payment.
- In the navigation panel, click Relationships>Cards.
Find the Card and Highlight it
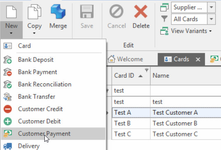
Right Click on the Card and highlight New>Customer Payment
orDrop down 'New'>Customer Payment from the top ribbon
The Customer Payment window displays.
- Enter header details for the payment:
- Enter the date of the payment. For transactions off a bank statement, this will be the statement date; for other transactions it will be today's date.
- Enter the full value of the payment received.
- Enter a description to best describe the payment received
- Select the correct tender method. This is very important as it affects bank reconcilations.
- Enter a reference for the payment. Working off the bank statement, the reference must be at least one word that is on the bank statement that best references back to this direct deposit.
If Paid by cheque then enter the cheque number and ensure to select the drawer details.
- When you have finished, you have two options.
- Click Finalise to finalise the payment without allocating it.
- Click Finalise and Allocate to finalise the payment and allocate it against an the open items in the list.
Reversing an existing customer payment
There are many ways within Readysell of reversing a Customer Payment. The method below is working from the Customer Transactions.
Readysell will only allow you to reverse a customer payment into a date that has not been reconciled.
If a bank reconcilation has been extracted and posted for that date you are trying to reverse the customer payment into, the system will pop up with a validation error. You can only choose to close. By closing, you then have the option to either enter a date that has not been reconciled to stand for the reversal or not reverse the customer payment at all and click on Close.
You can reverse just the customer payment and/or the customer payment along with the allocated open items.
The system will prompt you with a validation if the payment has allocations against it and you can choose to 'Ignore' or 'Close'.
If you choose to Ignore and continue with the reversal of the customer payment, the system will create a reversal customer payment and set all the open items allocated against the customer payment to be outstanding.
The system creates a customer payment in reversal and writes 'Reverse' in the description field and flags the original payment as reversed.
The original payment along with the reversed payment are allocated against each other.
Through Customer Transactions
- In the navigation panel, click Relationships>Customer Transactions>Payments
Drown the Filter to show 'All Customer Payments'

Search for the customer payment value in question or for the cardid or for the customer.
- If a payment has not been reversed, the Reverse action button will be active.
- Highlight the payment
- Click on 'reverse' action button
If the payment has an allocation you will get a validation error

If you wish to reverse both the customer payment and open items that are part of this allocation, click on Ignore.
You are now prompted with a date. This will be the date for the reversal. If you leave the default date, you could get an error if this date is part of a posted bank reconciliation. Click on Ok

Validation error pop up box will appear if the date is in a reconciled period. Click on Close and decide if you still want to reverse the customer payment or not. If you do, change the date on the reversed transaction and click on OK

By reversing a customer payment that has allocations and dating the reversal a different date, the system creates the reversed customer payment and allocates it against the original customer payment and all the open items that were linked to the original customer payment are now outstanding.
Through Cards
- Log onto Readysell>relationship>cards
- Find the card in question and highlight
- Click on Status Tab
- Click on Open items
- Find the customer payment
- Either right click and select 'source record' or highlight the payment and click on 'source record' in the detail ribbon
- the payment will appear to screen
- Click on Reverse action button
- A date window will appear. Normally you would date the reversal the same date as the original. If a bank reconciliation has been done for that date range, then you will have to date it another day.
- You maybe prompted that the payment has been allocated, select Ignore then enter a date and click on OK
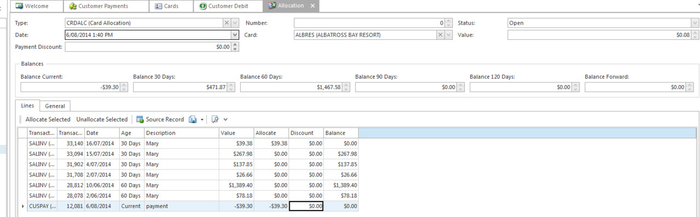
Using the customer payment discount feature on over and under payments
If a customer has overpaid or underpaid you by only a few cents you can write this off at the time you allocate the payment against the open items by entering the difference into the Discount field on the transaction type of 'CUSPAY' at time of allocation.
Do not apply any writes off to discount on the Sales Invoice or Sales Credits only to the Payment itself.
If the method of Payment received is Cheque, firstly enter the Bank and Drawer details onto the customers card before starting the customer payments. Card general settings
- In the navigation panel, click Relationships>Customer Transactions>Payments
Click New. The Customer Payment window displays as below.
- Enter the date of the payment. For transactions off a bank statement, this has to be the date that is on the bank statement. For other transactions it will be today's date.
- Enter the full value of the payment received
- Select the Customer from the drop down filter and draw it to the screen
- Enter a description to best drescribe the payment.
- Select the correct tender method. This is very important as the tender selected affects the bank reconciliations.
- Payment reference needs to be at least one word that is from the bank statement that reflects that payment received typed in correctly.
If you receive a Cheque payment then enter the Cheque number into the Payment Ref field.
- If the payment is by cheque, ensure that you add the Cheque Bank Details to the Card first off before you commence entering the customer payment. Card general settings
- When you have finished entering the payment details, you have one if two options.
- Click Finalise and Allocate to finalise the payment and allocate it against an invoice and use the discount feature
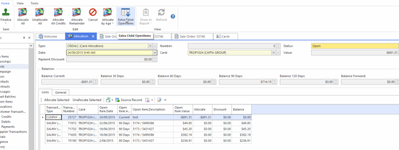
You are now taken to the Customer Payment Allocation Window
Highlight each open item that makes up the payment and click on 'allocate selected'.
A balance will remain in the 'Value' field at the top of the allocation window depending upon if it is an over payment or under payment.Overpayment:

If the balance in the 'value' field is a negative value, on the line detail of the allocation for the transaction type of 'CUSPAY' enter the Negative value in the discount field (mine sign in front of the value) and click on Tab. This means that the customer has overpaid by a few cents and you wish to write it off at the time you enter the payment and allocate it.
The balance in the value field should now be 0.00. That means that the Payment value +/- the discount - Open items flagged = 0.00

Click on Finalise
Once this over payment has been entered and allocated with a discount value and finalised, the system will automatically create a CUSDEB onto the customers card (customer debit) to stand for the discount value and it will be dissected against the general ledger account of 'Discount Given eg 61050'.
Underpayment:
If the balance in the 'value' field is a positive value, in the line details of the allocation for the transaction type of 'CUSPAY' enter a Positive value in the discount field and click on Tab. This means that the customer has underpaid by a few cents and you wish to write it off at the time you enter the payment and allocate it
The value should now be 0.00

Click on Finalise
Once this underpayment has been entered and allocated with a discount value on the transaction type of Cuspay and finalised, the system will automatically create a CUSCRE onto the customers card (customer credit) to stand for the discount value and it will be dissected against the general ledger account of 'Discount Given eg 61050'.
- Click Finalise and Allocate to finalise the payment and allocate it against an invoice and use the discount feature
Allocating Customer Payments/Credits from within a Card
If a payment has been entered and not allocated at time of entry, when manually allocating the payment against the open items, check what date you wish to date the allocation based upon the date of the Payment in relation to Ageing.
Normally the Allocation date is the same date as the Customer Payment.
- In the navigation panel, click Relationships>Cards.
- Search for the Cardid or Card Name
Highlight the Card that needs to have the outstanding payment allocated against the outstanding open items
Click on Status Tab
- Click on Customers Open Items tab
Click on the Filter within the open items tab and select 'Unallocated Open Items'
- HIghlight the outstanding Payment/Payments/Credit and the outstanidng Open items that make up the Payment/Credit. The nett result should be 0.00 in the Pay $ field.
Then Click on the action button within the detail list view 'ALLOCATE'

The allocation window appears
- If you have crossed over a period and you wish for the allocation date to be in the month before, change the allocation date. This normally only affects payments made the first day of the month and the payment backdated to the last day of the previous month, then the allocation date should be the same date as the payment no other reason.
Check your allocation, check the value = 0.00 and click on Finalise to finalise the allocation.
Allocate Selected button (Payment allocations)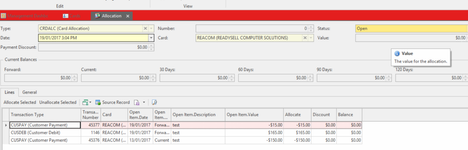
Allocate Remainder button (Payment allocations)
Unallocate Selected Button - Payment Allocations
Allocate by Age button (Payment allocations)
Allocate All Credits button (Payments allocation)
Unallocate All Button - Payments Allocation
Entering one payment and allocating one payment against multiple cards setup
Overview
There is a tendency to receive one full payment but that payment is across a few or many customer accounts.
You can either, work out what the value is for each customer card and insert customer payments for each of those customers or you can set up one customer card from which the full payment was received from being the master and having children. Then insert the one payment against the master customer card and extract the open items of the linked children onto the allocation window. Please note, that the full customer payment will be on the customer's card that the payment was received from but there will be no customer payment on any of the other cards that the payment also relates to.
Setting up Cards for Multiple Payments
- In the navigation panel, double-click Relationships then Cards.
- Find and note down the Cardid from whom the payment came from
- Select/search the child account (that is the card that the payment did not come from)
On each of the children's accounts click on the 'General tab' then click on the 'Groups' Tab
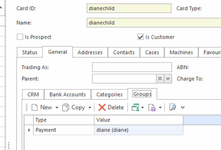
- Click New> Add the parent Cardid account (who made the payment) to each one of the children's cardids
- Leave type = Payment
- Click on Save and Close
Entering the Payment and allocating against multiple open items from other cards
- Stay in Cards
- Highlight the cardid that the payment was received from. Then use the manual customer payment method to create customer payment. You cannot use the 'Pay' action button from within Cards to extract multiple open items on multiple cards.
- Drop the New and select Customer Payment
- The customer cardid on the actual customer payment must be the Parent Account NOT the Child Account
- Enter the Total Value of the payment, date, description, tender, and payment reference. (Date and Payment Reference must be as per on the bank statement)
- Click 'Finalise and Allocate'
From within the allocation window, click "Extract Child Open Items"
- A list of open items from the Children Cardid will be added to the allocation window. This then allows you to allocate the payment to the parent and the child's open item.
- Once completed the selection click on Finalise.
Entering a customer payment against an underpaid invoice
Overview
A customer payment in Readysell indicates that a customer has made a payment for the items they have purchased. A payment can be received via direct deposit, cheque, EFTPOS or cash.
If the customer has underpaid an invoice, then leave the outstanding amount on the underpaid invoice/credit.
If the payment is received by cheque, ensure that you add the cheque bank details to the card first off before you commence entering the customer payment. See Card general settings.
Procedure
- In the navigation panel click Relationships> Cards
Find the card and highlight it
Click on the drop down action button on the top left labelled New

Select Customer payment
The "Customer Payment" window displays with the cardid you had highlighted
- Enter header details for the payment:
- Enter the date of the payment. For transactions off a bank statement, this will be the statement date; for other transactions it will be today's date
- Enter the full value of the payment received
- Enter a description to best describe the payment received
- Select the correct tender method. This is very important as it affects bank reconcilations
- Enter a Payment Reference. Usually one word off the bank statement, could be card ID or card name. If payment is received via cheque then enter the cheque number
- If payment is cheque, ensure you select the bank details
- When you have finished, you have one of two options.
- Click Finalise to finalise the payment without allocating it
OR - Click Finalise and Allocate to allocate the payment
- Click Finalise to finalise the payment without allocating it
- The allocation window will appear
- You will notice that the full amount of the payment has been allocated
- If there are many invoices that make up the payment, then firstly highlight the Invoices that have been fully paid and click on Allocate Selected
- Then highlight the last part paid invoice and click on Allocate Remainder. You will notice that there will be a balance on this open item as it has been part paid.
- If the payment is only being allocated against one Invoice, then you will only need to highlight that one invoice and click on Allocate Remainder
- The value in the top right hand side on the "Allocation" window has to be zero before you can finalise the allocation
- Click on Finalise
Entering a customer payment - where they have overpaid
A customer payment in Readysell indicates that a customer has made a payment for the items they have purchased. A payment can be received via direct deposit, cheque, eftpos or cash.
If the customer has overpaid you, then leave the outstanding amount on the PAYMENT itself. That is on the transaction type = CUSPAY.
Never turn a Invoice into a Credit or a Credit into a Invoice.
If the payment is received by cheque, ensure that you add the Cheque Bank Details to the Card first off before you commence entering the customer payment. Card general settings
- In the navigation panel, double-click Relationships then Cards.
Find the Card and Highlight it
Click on the Drop Down Action Button on the Top Left 'NEW'
Show Me
The Customer Payment window displays with the Cardid you had highlighted
- Enter header details for the payment:
- Enter the date of the payment. For transactions off a bank statement, this will be the statement date; for other transactions it will be today's date.
- Enter the full value of the payment received.
- Enter a description to best describe the payment received
- Select the correct tender method. This is very important as it affects bank reconcilations.
- Enter a Payment Reference . Usually something off the Bank Statement, could be cardid, cardname. If payment is received via Cheque then enter the Cheque Number.
- If payment is cheque, ensure you select the Bank details
- When you have finished, you have one of two options.
- Click Finalise to finalise the payment without allocating it.
OR - Click Finalise and allocate to allocate the payment
- Click Finalise to finalise the payment without allocating it.
- The allocation window will appear
- You will notice that the full amount of the Payment has been Allocated.
- Firtsly highlight the transaction type of CUSPAY and click on 'Unallocated Selected'

- Highlight all the Open items that make up the Payment and click on 'Allocate Selected'.
- If one of the Invoices/credit has been part paid, then enter the value that has been paid into the allocated field.
- Now go back to the openitem transaction type = CUSPAY, highlight it and click on the action button from the top ribbon 'Allocate Remainder'

The Customer Payment will have a value of the Over Payment in the Balance column.

- If the Balance is very little then you can follow the steps to use the Discount Feature if you like. Customer Payment Discount Feature on over and under payments through Customer Transactions.
- Otherwise click on Finalise
- The Value in the top right hand side on the Allocation window has to be zero before you can finalise the allocation.
Making a Payment with a tender that has a Surcharge Fee
There is a set up procedure to be done before a surcharge will apply to customer payment.
See link below Setting a surcharge fee % on a tender at time of a Sale and/or Customer Account Payment & a Subtracted Fee
Learn more
Learn more
Refer to the "Sale Invoices" section of the Readysell User's Guide to learn more
Sending customer statements using an email batch
Learn more
Refer to the "Email Batches" section of the Readysell User's Guide to learn more
Cards Overview
Key Features
Cards are used to keep track of information about an organisations that are of interest to your business. Some of the key information on cards include address and contact information, as well as settings about how transactions for the card are used within Readysell. Transactions use cards to identify the customer or supplier details where required. Cards control the flow of transactions and display the balances and open items that result from transactions.
Cards can be either customers, suppliers, manufacturers, prospects or any combination of these:
- A customer is a person or company to whom you have supplied goods for payment.
- A supplier is a person or company from whom you have purchased goods on credit.
- A manufacturer is a person or company that produces goods.
- A prospect is an organisation with which you want to build a future customer relationship.
- A contact is a card that is not flagged as being a customer, supplier, prospect or manufacturer.
For Office Brands stores:
Customer cards can automatically send up to Org Admin/Web Admin using the button Send To Web (whether it sends only to Org Admin or both Org Admin and Web Admin will depend on what settings your store has with Office Brands/your website.
If you have "auto approval " turned on, it will go straight into Web Admin
if you have "manual approval", you'll need to approve through Org Admin
Salesperson.
There are two ways of reporting on a salesperson.
You can report on the Sales Person that was active at the time the sale was completed. The name of this field is 'Sales Person'.
You can report on the salesperson currently on the card irrespective of whether you have changed it or not. The name of this field ' Customer Primary Sales Person.
Creating a new customer
Overview
A customer is someone to whom you provide goods and services on credit and from whom you agree to receive payment for these goods and services. Customers are also known as Trade Debtors and Accounts Receivable.
In Readysell, you set up a card for each customer to track all transactions associated with them. This includes sales, service orders, invoices, payments and credits.
The steps below guide you through the actions required to set up a customer in Readysell. Depending on the way your system is set up, you may need to fill in some other fields. If you try to save a customer record without filling in all required fields, Readysell will tell you which fields you still need to fill in.
Procedure
- In the navigation panel, double-click Relationships, then click Cards.
Click New in the ribbon to create a new card. The Card Details screen will display.
If you are creating a customer that is similar to an existing customer, you can use the Copy option to copy some of the existing customer's details.
- In the top section of the Card Details screen, enter details for the card as follows:
- Card ID - short code for the product
- Card Type - this is optional
- Status- there is no need to changed the field
- Enter customers Name
- Tick Is Customer to mark this card as a customer.
- Click on the General tab.
- Fill in the following fields as necessary:
- Click on the Bank Accounts tab.
- Enter bank account details for the customer as follows:
- Click New to create a new account.
- Enter the payee name, BSB and account number.
- Check Customer Primary Account- If customers primary acc.
- Repeat this process for as many bank accounts as you wish to add.
- Click on the Addresses tab.
- Enter address details for the customer as follows:
- Click New to create a new address.
- In the Name field, enter the customer's name.
- In the Street 1-4 and Suburb fields, enter the customer's address details.
Check the purpose of this address: Accounts, Delivery, Physical or Postal. An address can have more than one type.
Delivery must be checked if the address is to be used for the customer’s invoice and/or delivery docket.
Repeat this process for as many addresses as you wish to add.
- Click on the Contacts tab.
- Enter contact details for the customer as follows:
- Click New to create a new contact.
- Enter Name of person.
- Enter Job Description for the person.
- Enter their Web ID- optional
- Enter the Phone, Mobile, Fax and Email Address optional fields.
- Enter persons Role.
Select one of the checkboxes, specify the roles that the contact plays within Readysell.
If only one contact then you can mark them as a Primary Contact instead of selecting individual flags to make sure no issues arise when issuing statements, invoices and delivery dockets.
Repeat this process for as many contact people as you wish to add. You must have at least one contact person.
Click on the Settings tab, then the General Settings sub-tab.
- Fill in the fields as follows:
- Select Card Status- Optional
- Enter customer discount in Discount from List field - Optional
- Optionally, assign a Tax Code to the card.
- Check Available on POS - Optional
- Click on the Customer Settings sub-tab.
- Fill in the following fields:
- Select the Customer Tender - (Optional) If you leave this empty, at the time of completing a sale, you must choose the tender. If you preset it using this field it means at the time you go to complete a sale, it automatically tenders off to this tender without you having to select it. You cannot change this tender during the sale if you preset this.
- Select the Payment Tender - (Optional) this is the payment tender used at the time of a CUSPAY (Customer Payment). It defaults the field but you are able to change this on the current transaction you are trying to process.
- Select a Payment Term the customer will have with you
- Key in a Credit Limit - If you do not set a credit limit, you will be warned every time that the customer is over their credit limit and the sale will go on hold.
- Select Invoice Mode - Manual Invoicing is where every picking slip gets invoiced, Batch Invoicing is where the customer gets one invoice per month (they get delivery dockets for each of the goods that go out), Invoice Per Order is where the customer gets an invoice once their order is completely supplied (they get delivery dockets for each of the goods that go out)
- Select the Supply Type - you must fill this one in - this supply type is used at the time of a sale. If you do not fill this in, you will not be able to ship or complete an order or a shipment.
- Enter any other appropriate details. See Card settings to learn more about the fields on this tab.
Click Save to save the customer's record in Readysell.
Creating a new supplier
Procedure
- In the navigation panel, double-click Relationships, then click Cards.
Click New to create a new card. The Card Details screen will display.
If you are creating a supplier that is similar to an existing card, you can use the Copy option to copy some of the existing card's details.
- In the top section of the Card Details screen, enter background details for the card:
Card ID
If you are part of the Office Brands group then ensure that you use the Supplier Card Ids from the Data Portal.
You can download a spreadsheet to identify the supplier card ids from either the Data Portal or your price book.- Card Type- this is optional
- Status- there is no need to changed the field
- Enter customers Name.
- Tick Is Supplier to mark this card as a supplier.
- Click on the Status tab.
- Fill in the following fields as necessary:
- On Stop: if On Stop is flagged, any purchase orders placed for this supplier will automatically be put on hold; it then requires a user with appropriate permission to release the order.
- Account Closed: if this is flagged, the supplier will not be visible when placing purchase orders, supplier misc debits, misc credits or payments. You should not have to do this for new suppliers.
- Enter Last Sale Invoice- Optional
Enter Last Purchase Invoice Date- Optional
- Use Column Chooser to add column name Comment to the Status tab display layout
- Comment can be configured via system reference PURCHASE-INVOICE-OPEN-ITEM-COMMENT of the Purchasing system type to display one of the following
- Site
- Purchase Order Transaction Number
- Purchase Receipt Transaction Number
- Assign the system reference to the required property e.g. PurchaseOrderTransactionNumber.
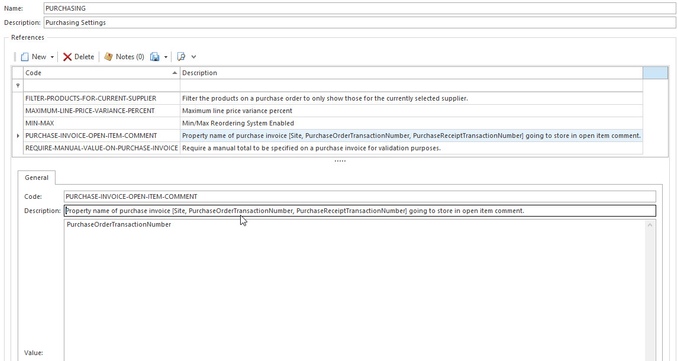
- Use Column Chooser to add Comment column to the Status tab.
- Comment column will display the value of the system reference property assigned above e.g. 5977 is the purchase order transaction number
- Note that the displayed value is persistent i.e. the value is bound to the property assigned at the time
- Click on the General tab.
- Fill in the following fields as necessary:
- Enter Trading As- Optional
- Enter ABN for the company- Optional
- Select Parent
- Click on the Bank Accounts tab, should you have the supplier's bank account details.
- Enter bank account details as follows:
- Click New to create a new account.
- Enter the payee name, BSB and account number.
If this is the supplier's primary account, check Supplier Primary Account.
Repeat this process for as many bank accounts as you wish to add. See Card bank accounts for more information on adding bank accounts.
- Click on the Addresses tab.
- Enter address details for the supplier as follows:
- Click New to create a new address.
- In the Name field, enter the supplier's name.
- In the Street 1-4 and Suburb fields, enter the supplier's address details.
- Check the purpose of this address: Accounts, Delivery, Physical or Postal. An address can have more than one type.
- Repeat this process for as many addresses as you wish to add.
- Click on the Contacts tab.
- Enter contact details for the supplier as follows:
- Click New to create a new contact.
- Enter Name of person
- Enter Job Description for the person
- Enter their Web ID- optional
- Enter the Phone, Mobile, Fax and Email Address optional fields.
- Enter persons Role.
Select one of the checkboxes, specify the roles that the contact plays within Readysell.
Repeat this process for as many contact people as you wish to add. You must have at least one contact person.
- Click on the Settings tab, then the General Settings sub-tab.
- Fill in the fields as follows:
- Select Card Status- Optional
- Discount from List field does not apply to suppliers.
- Optionally, assign a Tax Code to the card.
- Available on POS does not apply to suppliers.
- Still on the Settings tab, click on the Supplier Settings sub-tab.
- Fill in the following fields:
- Select the Tender- Optional
- Select a Payment Term
- Check Back Order Allowed to allow back orders with this supplier.
- Supplier Acc Number field.
- Enter any other appropriate details. See Card settings to learn more about the fields on this tab.
Click Save to save this card in Readysell.
Card references covers details about optional tabs on this detail view including cases, machines, favourites, schedule, tags, notes and customer fields
Creating a new manufacturer
A manufacturer is a person, group or company that manufactures goods. A manufacturer in Readysell may also be a customer, a supplier, or both.
Learn more
Refer to the "Cards" section of the Readysell User's Guide to learn more.
Click New to create a new card. The Card Details screen will display.
Tip
If you are creating a manufacturer that is similar to an existing card, you can use the Copy option to copy some of the existing card's details.