Locations in administration
Planning your locations
Locations define the way stock moves through your warehouse or retail business. You can't get the best our of your system without first planning your locations:
- Your business may have a number of sites. Each site represents a physically separate warehouse.
- Within each warehouse is a number of zones:
- Zones may be areas such as fast pick, mezzanine level, bulk storage, heavy stock for picking last, retail, technician trucks, back order receipts, showroom and quarantine stock awaiting credit.
- Your site/s might best be handled as a single zone in each site. But considering zones is critical. There is probably some stock that could benefit by being logged into a zone
- Picking slips are picked in alphabetical order by zone. If for example you have some pallets of paper to put directly into deliveries without being picked separately, put them in zone "ZZZ".
Zones only effect the order in which stock is picked. Zones do not effect stock allocation.
- Retail businesses need larger locations:
- You need to still location your stock in a retail business
- Product location labels containing a barcode for the location and the product should be affixed to the appropriate fixture. So you can stocktake and put away stock even if there is none on the shelf
- Price changes can automatically generate shelf labels
- Stocktake by location can be used to setup, adjust and move stock between locations
- Locations define the fixtures in your business into which stock may be placed. You can get away with using bays some two meters wide if you are a retail outlet. For warehouses you want to go right down to the shelf level to get as efficient a picking process as possible.
- Locations are picked in alphabetical order. So the location coding system you use needs a lot of thought as it is critical to the picking process. If you use numbers make sure you put "0" characters at the start so they all sort the same. Or you use four numbers, the first number is "0004" not "4".
- In summary the procedure for naming your location codes is:
* Determine the longest location code you are going to have
* Determine the longest numeric element you may have in your location code
* Setup all your location codes so any numbers inside the location codes are always padded with zeros. So the number is on the right.
* Sort the location list by code and check they sort as you would expect.
Example
Locations start with two letters
The two letters may be followed by a number up to 1000 long.
The location code has to be
[XX][000N]
Where
XX is two letters. You can't have just "A", if you have letters you have to always have the same number of letters in the same place
000N is the number, eg. 0001,0100,0900,2100. The number is always the same length - Fixing your locations
If your locations do not always have numbers/letters in the same position and of the same length. Just go to locations and fix the codes until they do.
- Locations are picked in alphabetical order. So the location coding system you use needs a lot of thought as it is critical to the picking process. If you use numbers make sure you put "0" characters at the start so they all sort the same. Or you use four numbers, the first number is "0004" not "4".
- Product locations are automatic. This is the list of products currently stored in any location. The system tracks those details automatically. They don't need any setup unless you wish to set min/max levels for stock replenishment for products such as those in trucks or in fast pick areas.
Setup all your locations before you start using Readysell
Locations are where the products are located in your store. I.e. Aisle 5 Shelf A Row 1 (5A1)
- From the Navigation panel
- Double click on "Administration"
Click on "Location"
The Locations window opens (Code and Description will be defaulted to your store's actual locations or is waiting to be set up with your locations)

- Click on button "New"
A new Location system reference creation window opens

- The site for the Location is being set up for. (If you have just one site, leave this as WHS. If you have multiple sites, select the site you are setting this Location up for)
- Key in the "Code" to stand for this new Location (I.e. 5A1)
- Key in the "Description" of this Location code (using the above example: Aisle 5 Shelf A Row 1)
If you wish to Quarantine the location, that is you do not wish to Allocate Stock to this Product, Turn the Tick on 'Quarantine'. Otherwise leave it blank. If the Tick is on and you wish to remove it from Being Quarantine, then turn the tick OFF and Save

If you wish to set a Supply Type to a Product location, on the General Tab Select one of the Supply type in the drop down list.
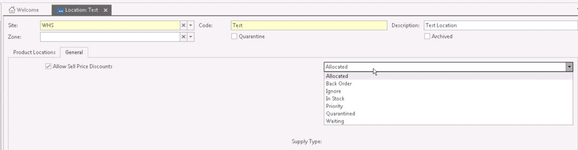
- Click "Save and Close"
- Your new Location is ready to be used/selected in your product/Inventory file.
Tip, you can use stocktakes to setup product locations
If you have not yet setup your locations properly. The first step is to enter the locations into the system as noted above. But then you have a problem because you have not yet recorded which products are in each location. Even if you have correct quantities on hand this is an issue.
Doing a full stocktake is a lot of work. If your stock on hand is currenly ok, it may be best to avoid having to count all the stock. The simple way to correct the problem is to do a series of stocktakes for the whole business. But instead of entering a quantity on hand, just specify the location and press the update location button on the stocktake. This will setup the primary location for your product. If you have stock in multiple locations. you will need to stocktake the stock in the second location. See stocktaking for details of how to manage this if required.