Generating supplier payments using a supplier payment run
You do not need to submit this payment using just the ABA file, you can manually upload the supplier payments if you dont have the ABA file set up.
If you are going to use ABA (Australian Banking Association) please ensure you follow the setup for the ABA file before you commence Payment Runs. Setting up automatic generation of ABA files for supplier payments
You may need to contact Readysell for the setup of the ABA File .
Ensure that Readysell has set up the Tenders, ABA, Bpay file before you can commence a Supplier Payment Run.
If you should have a problems with either emailing remittances and/or generating ABA file from within a Supplier Payment, DO NOT REVERSE EACH INDIVIDUAL SUPPLIER PAYMENT. Contact Readysell.
If you feel you have made a mistake with one supplier in the payment run, DO NOT REVERSE EACH INDIVIDUAL SUPPLIER PAYMENT RUN only reverse the supplier payment that does not look right or contact Readysell.
If you have overlooked or the supplier open item is not part of the payment run, go back to the supplier and check. If the transaction does not exist you can still insert the transaction as long as it has the right date and if you the payment run is still open, you can still re extract into the run and take up the transaction.
Before commencing a supplier payment run, you should have reconciled the supplier remittances against the open items in Readysell to ensure that the data is correct.
You cannot overpay a supplier open item within the run, however you can underpay and leave a balance on the open item. If the open item you wish to pay is greater than the transaction entered into Readysell you need to go back to the source transaction and fix it.
Also in respect to Supplier Credits or Purchase Credits within the payment run, they are not allocated to be paid it is up to your discretion when you want to take these credits up and in what period. They are part of the field 'Balance' but not part of the field 'Payment Value'.
If the overall supplier balance for a Supplier is in Credit for a due date that has been selected in a payment run, then this supplier will not be part of the supplier payment run. You will have to do a manual supplier payment from the suppliers card, highlighting the open items you wish to pay and allocate accordingly.
If you wish to see all outstanding open items for a supplier and not just the open items due to be paid, set the due date on the supplier payment run to be a date in the future.
Supplier Card data tidy up
- Supplier Account Number within the Supplier Settings Tab on each Supplier Cardid
- Assign a Payment Term within the Suppliers Settings Tab
- Set a Supplier Tender within the supplier settings tab
- If you are going to email the supplier the remittance, within Supplier Settings Tab, turn the Tick on for 'Auto Email Remit' and also from within Contacts tab> a contact name, email address, job description, ‘is receivable’ ticked – if you wish to email the remittance.
- On the Address tab, ensure at least one address is flagged as 'Accounts'.
- If you are using the ABA file to pay the supplier check all set up have been done. see link Setting up automatic generation of ABA files for supplier payments
- If you are using the Bpay file to pay the suppliers check all set up has been done. See link Setting up automated generation of Bpay Supplier payments.
- Ensure that Readysell has set up a Tender to stand for the Supplier Payment via ABA or Bpay or just EFT. Do not just select any tender.
Supplier Payment Run
- From the Navigation panel, double-click Relationships>Supplier Transactions>Payment Runs
- Check that there are no outstanding payment runs by dropping the filter in the ribbon and selecting Outstanding Payment Runs. If there are you will need to finalise it.
- Then click New to create a new payment run
- The New Payment Run window appears
Check the Payment date. If you are not lodging the payment today you can change the date to reflect when you are actually going to transfer the money
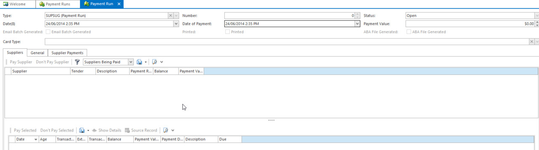
Click Extract Open Items.

Extract Open Items pop up box will appear
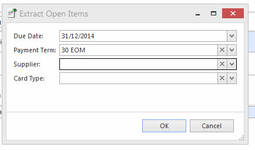
- Enter Due Date. That is the further due date for all invoices to be paid. The system will look at anything with a due date less than or equal to the date you enter. Eg if you wish to pay all supplier invoices for March that have a payment term of 30 end of month, then the due date on these invoices will be 30th april or 1st may.
- If you wish to narrow your critera down, you can enter a Payment Term and/or One Supplier and/or One Card Type otherwise leave these fields blank to extract all Open items due for payment
Click on OK to continue.

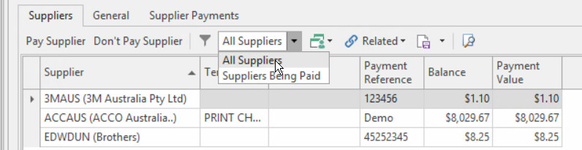
- A list of suppliers will appear on the screen.
Summary in the header area and detailed open items list for each supplier further down Ensure you are on the filter in the detail area of ‘All suppliers’
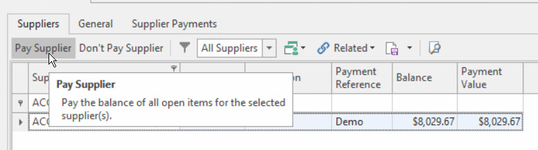
- Suppliers and Payments can be marked as Pay or Don't Pay.
The easiest and quickest way to maintain a very large list extracted for payment would be to highlight all the suppliers in the details list view and click on 'Don't Pay Supplier'.
This flags all the open items in the list to have a payment value of 0.00.
If the list is very small you don't have to do this, you can go through each supplier and manually work out what needs to be paid and not paid.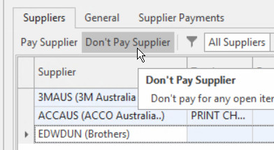
- Now add a search filter to your list view by following the steps below so that you can search for each supplier. Easier to set up a view variant to suit your needs View Variants Button
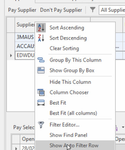
Right click on any field heading and select ‘show auto filter’ . A search bar will appear across the entire row
Start searching for the first supplier you wish to pay by entering part of or all of the supplier code into the Supplier field
- That supplier will appear, with a header line and a list of one/or many invoices/credits that make up the item
- If you are paying the full amount owing to this supplier, click on ‘Pay Supplier’ in the header area
If you are paying only one/many or part of an invoice then work in the detail area
- Keep going by searching for each supplier that you wish to pay and mark the ones you want to pay being either the full value on the header or certain open items in the detail area.
- As you make changes to the Payment Run Work file ensure you always click on SAVE
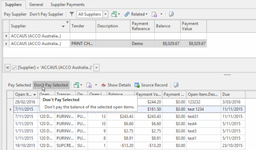
- As you are flagging suppliers/open items for payment to the batch, the Payment Value in the top right hand side of the batch will increase.
There are two fields, Balance and Payment Value.
Balance is the sum of all the Open items owed to the supplier irrelevant of whether you have marked the open item to be paid or indispute
Payment Value, is the sum of the openitems flagged to be paid. There is a field checkbox 'Indispute'.
If this checkbox is already TICKED, that means the open item will not be part of the Payment Value but part of the Balance.
If the checkbox is not TICKED, then this open item value is part of the Payment Value and Balance.Once you are happy and think you have all the suppliers flagged to be paid, double check by changing the filter in the detail area, to be ‘Suppliers to be paid’.1.To mark a supplier open item as 'IN DISPUTE' after you extract the supplier payment run:
Find the Supplier
Highlight each open item you wish to flag as In Dispute and not be part of the Payment Value
Either manually click on the field 'Open Item.InDispute' and tick it
Click ON SAVE
OR
Highlight each open item, click on the action button 'Show Details'
Turn the tick on for each of the open item
Click on SAVERemember to constantly click on SAVE for any change made to the supplier payment run
2.To unmark a supplier open item that is 'IN DISPUTE' after you have extracted the supplier payment run:
Find the Supplier
Highlight each open item you wish to turn off the 'In Dispute' checkbox
Either manually click on the field 'Open Item.InDispute' and turn the tick off
Click ON SAVE
OR
Highlight each open item, click on the action button 'Show Details'
Turn the tick off for each of the open items
Click on SAVERemember to constantly click on SAVE for any change made to the supplier payment run
Once you have done this for all suppliers, you must RE-Extract the same supplier payment run and click on SAVE.
Check that the Full Payment Value equals your manual worksheet or statement
Ensure to always click on SAVE as you make changes within the payment run. It is like an excel worksheet being maintainedNow Click Set Payment Defaults. Here the system will allow you to fill in the tenders, description and payment reference that are blank on the supplier payment run batch

Set Payment Defaults pop up box appears
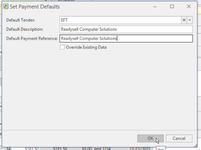
Select the main tender to be used eg EFT
Enter your Company name maybe in the Default Description
Enter your Company name maybe in the payment reference
Leave Blank ‘Override existing data’ do not turn this on
This means that where for a supplier within the batch, there is no tender, no description and no payment reference, what you have entered will populate onto the batch run
Click on OK.- Now Click on SAVE
- You can change the tender, the description and payment reference on any one of the suppliers if you need to
- Click on SAVE
Check the payment run once more before you click on Generate Payments
- Click Generate Payments. This will generate the Payments to the Suppliers account and post the payment run.
You are now warned that you are going to generate a payment for each supplier marked as pay. Click on Yes to continue or no to go back to the batch and make changes

- Click on Refresh until the Status on the Batch changes from Posting to Posted
When the status changes to Posted, the Action buttons in the top ribbon become available for the next steps, that is email batch/print remittance and generate aba file.

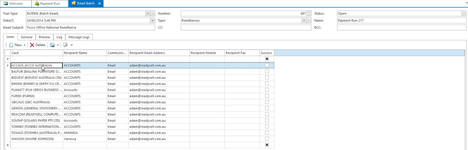
Next Click on Generate Email Batch This will email all remittances to suppliers that have been setup with an email address correctly on the card contact

Ensure beforehand that all suppliers within the batch, have a contact with an email address and ‘Is Receivable’ check box is on for that Supplier if you wish to email the remittance .
Also ensure that on the settings tab within the supplier card the check box of ‘auto email remit’ is ticked otherwise that supplier will not be part of the email batch and you will need to print the unemailable remittances.- A window appears with a list of all the Suppliers you are about to email
You can add or change the ‘Email Subject’
You can change/remove the CC
You can change/remove the BCC
You can change the Default name
Then click on Save- Check the suppliers listed in the batch
If a supplier appears more than the once and you don’t want to send out more than 1 remittance, firstly go to the suppliers card and tidy up the contacts. Then go back to the email batch highlight the one contact you don’t want to email and click on ‘Delete’ in the detail area and then click on SAVE.
Have a glance and make sure no email addresses within the batch look silly.
Do that for all suppliers in the list ensuring to click on SAVE once you are happy with the end result of the email batch.Click on the button Run Batch Now to generate and email the remittances out.

The tab of ‘Log’ in the detail area will open with the status of the email batch reading ‘Posting’
The email batch will display a log message of ‘starting remittances email batch run
When the emails have finished sending a message will appear in the log ‘remittance email batch completed.’ And the status on the email batch flips to Posted
Close out of the email batch run and go back to the Payment Run
- If you have suppliers not set to email you have the choice to print these or even print all remittance
Drop Down the ‘Print Remittances’ and make your choice
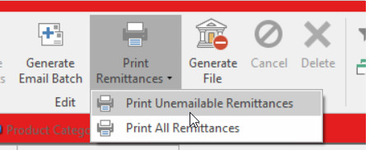
The Remittances will preview to screen.
Print them off if you haven't emailed them or the supplier has not been set to auto email remittances.
Close out once doneIf you are using the ABA file Generation the next step is to click on ‘Generate File’.
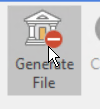
Ensure that the Suppliers cards , have the payee name, BSB and Bank Account set up with the ‘Primary Supplier Account’ tick on. If you don’t you can still do this whilst the batch is open.
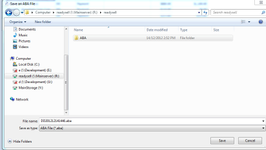
Ensure that Readysell has been set up for the ABA settings first.A window will open with where the ABA file is to be saved. You can change the name of the File if you wish and click on Save
Next log onto your bank account and follow the steps to upload the ABA file that you have just saved.
If you don’t use an ABA file upload then ignore this step and manually log onto your bank and manually enter the suppliers details etc that you are paying.
The system will open with a window to save the ABA file to.
Find the Folder called 'ABA' on the r:\Readysell\ABA normally
Save the ABA file and note down the aba number
Next is to log onto the Internet onto your bank account and Upload the ABA file that was just generated and saved