Performing a bank reconciliation manually (not importing the bank statement)
When you extract a Bank reconciliation, if there is a General Ledger Variance please do not continue with the Bank Reconciliation you need to submit a ticket to Readysell.
Check to ensure that there are outstanding bank reconciliations. You cannot extract a new bankrec if an existing bankrec has not been finalised.
Best practice is to download a bank statement in a form that can be imported into Readysell. The procedure below describes how to do your bank reconciliation manually. Once you understand the manual procedure as described on this page. As the next step, you should move on right awa to automate your bank reconciliation as much as possible. See: Automated Bank Reconcilation from a imported Bank Statement
From the Navigational panel, Click on Financials>Cashbook>Bank Reconciliations

Click on New> Extract Banking


- Select your bank account from drop down box
- Enter the statement closing balance date
- Click on OK
- Click on Refresh until the data appears
- Enter Statement Closing Balance off the Bank Statement and click on Tab
The system will extract all unpresented transactions into the bank reconciliation and draw the General Ledger Closing and actual GL Closing figures.

Working from a printed copy of your bank statement back to the Readysell Statement Lines on the screen
Drop the Filter in the Detail area and select 'Unmarked Lines'. That way as you start marking in Readysell the list reduces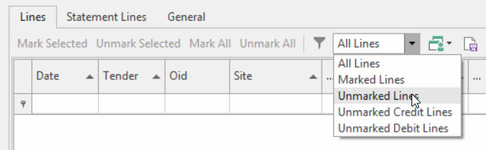
Starting searching for the Value working off the bank statement against what transactions in the bankrec and then click on Marked check box on the right.
Occasionally click on Refresh and Save
As you tag, various fields (values) will update (either increase or decrease).
Once you have finished marking all transactions from your bank statement, the variance should be 0.00 and the general ledger variance should also be zero

If you find that there are transactions on the bank statement that are Miscellaneous Transactions, that have not yet been entered into readysell click on New Banking in the top Ribbon
If the transactions that are on the Bank Statement are a Customer Payment or Supplier Payment they need to be entered through the Card firstly.
Inserting Misc Deposits/Payments/Transfers from within the Bank Reconciliation.
Drop down from the Top Ribbon NEW and select either New Deposit, New Payment or New Transfer

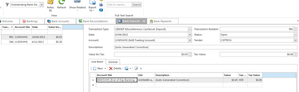
Example of a Bank Payment Entry
Enter the details of the transaction as per what is on the bank statement that is the Date, Tender, Description, Payment Reference, General Ledger Expense account, Value and correct Taxcode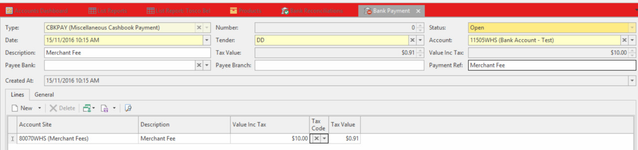
To complete this additional banking click on either
- Finalise with finalise the tranaction and close out 'FINALISE' BUTTON
- Finalise and New will finalise and take you back to inserting another transactions 'FINALISE AND NEW' BUTTON
- Once you have finished adding a New Banking and Finalised it, the transaction should appear in the Bank Reconciliation. Click on Refresh
- Mark the newly entered payment.
For Bank Deposits it is the same procedure
For Bank Transfers, Click on New>Bank Transfer>Enter the date that is on the Bank Statement>Select the From Bank Account>Select the To Bank Account>Enter the Value>Enter a Description>click on Finalise
The transfer should appear in the Bank Rec. Click on Refresh then Mark It. - Check the field Variance and GL Variance they should be Zero before you can Finalise your bankrec
- Click on Save and Close if you wish to Park your bankrec to one side until you get time to get back to it. 'SAVE AND CLOSE' BUTTON
Viewing the Source of the Bank Reconcilation Lines
As you highlight a transaction within the Bank Reconciliaton Lines, just below in another detail list view is the break up that makes up that transaction highlighted.
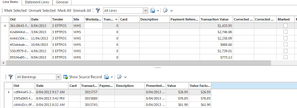
From the Detail LInes if you click on Show Source Record the system takes you back to the original entry of the transaction
- When you are ready to Finalise your bankrec and there is no variance at all and its balances, click on Finalise. 'FINALISE' BUTTON
- Once the Bank Reconciliation is Finalised for a Bank Account, You can commence the next bank reconciliaton for the same bank account.
- For information on how to search for an exiting transaction please see Searching and Filtering Lists
'Generate Corrections' Action Button:
'Corrected Value' Procedure:
The Action button of Generate Corrections is ONLY used if there is a slight variance between what is on the Bank Statement for a transaction versus what is in the Bank Reconciliation for the same transaction.
Usually the variance lies with Cash and is minimal.
If the value of a transaction in the bank reconcilation varies to the transaction value on the bank statement, you must go back to the source record in readysell and fix it and allow the change to flow through to the bankrec. Do not use the Correct Value for transactions that come from a card being either a customer payment or supplier payment.
Identify and Highlight the Transaction on the Bank Reconciliation line and in the field Corrected Value type in the correct amount that was actually presented on your bank statement and Enter.
You can either enter all the corrected values if there are any more or do one and a time.
- Once you have entered the corrected value, whether it be for one transaction or many, Click on Generate Corrections button in the ribbon .
The system will pop up with a Message Box giving you the details of the transaction that has just been generated.

- The system has now Generated either a Deposit or Payment for the Difference between the Value of the original transaction and the value you entered. That depends upon whether the corrected value was more or less than the transaction Value.
- Open up another Module, being either Bank Payments or Bank Deposit that was created for the variance. Once again depending on what the corrected value was. In the case of the example above, a CBKDEP was created.
- In the Bank Deposit Outstanding View List, there will appear a Deposit that was just generated from the Bank Reconciliation Generate Corrections.
The Status of this deposit will be Open
- Check that the details are correct on this Deposit.
- Check that the General Ledger Account is correct.
- Check that the Tax Code is the right Tax Code.
- Check that the tender is right. Note that some tenders are set to compress.
- In the Description Field at the Line Level you may wish to add another Description to help you remember why this Transaction was corrected.
- If you are happy with the Auto Generated Correction that has been generated.
- Click on Finalise to post and finalise the Transaction.
- Go back to the Bank Reconcilation that you were just on.
- The transaction that you created the Auto Correction for, will be generated for the difference between the value of the transaction - the corrected value and in the description field it will read '[Auto Generated Correction] with the value.
If the tender you used is set to compress, then the corrected transaction will be part of a compressed bank reconcilation line. Highlight it and mark it to present it.

'Corrected Date and Corrected Value' Procedure:
The corrected date is used when you need to correct a value on a transaction and the original date of that transaction has already been reconciled in a previous bank reconciliation.
If you fill in the corrected date and corrected value, when you click on generate corrections, it will set the date of the bank deposit or bank payment that was created for the difference to be the date of the “Corrected Date”. The “Presented Date” on the original banking will remain the same date as the original line, which means the correction will still show on the correct date on the bank rec (but will show on the corrected date in GL).
The Action button of Generate Corrections also works when you need to change the Date and Value together of a Transaction.
Identify and Highlight the Transaction on the Bank Reconciliation line and in the field Corrected Date type in the correct date and then click on the field Corrected Value and type in the correct value that was actually presented on the bank statement and Enter.

- Once you have entered the corrected value and the correct date, whether it be for one transaction or many,Click on Generate Corrections button .
The system will pop up with a Message Box giving you the details of the transaction that has just been generated.

- The system has now Generated either a Deposit or Payment. That depends upon whether the corrected value was more or less than the transaction Value.
- Open up another Module, being either Bank Payments or Bank Deposit. Once again depending on what the corrected value was. In the case of the example above, a CBKDEP was created.
In the Bank Deposit Outstanding List View, will appear the Deposit that was just generated from the Bank Reconciliation Generate Corrections.
The Status of this deposit will be Open with the date being the date entered and the value being the difference between the value of the original transaction - the value entered.Check that the details are correct on this Deposit

Check that the General Ledger Account is correct.
Check that the Tax Code is the right Tax Code.
- In the Description Field on the Line Level you may wish to add another Description to help you remember why this Transaction was corrected.
- If you are happy with the Auto Generated Correction that has been generated.
- Then Click on Finalise to Post the Transaction.
- Go back to the Bank Reconcilation that you were just on.
- The transaction that you created the Auto Correction for, would have generated a transaction with the description of Auto Generated Correction standing for the difference in value and the correct date.
Highlight it and mark it to present it.

Continue with your Bank Reconciliation.
- Once your bank reconciliation balances that is, there is no variance at all, click on Finalise.