Readysell-Office Brands Integration User Guide
- Peter Drill
Integration between your Readysell software and Office Brands is handled using a technology called "Web Services". Connecting your Readysell instance to WebSphere are two "middleware" applications. These are:
- RObI (Readysell/Office Brands Interace) o RObI is developed by Readysell and resides on your Readysell server. It sends and receives data from your Readysell database.
- ESB (Enterprise Services Bus) o ESB is managed by Office Brands head office. It accepts messages from RObI, WebSphere and suppliers and routes them to the appropriate recipient.
Assuming that these two "middleware" applications are transparent, the basic overview can be viewed as follows:
Purchase Receipts WebSphere Supplier Product Information and Images Customer Invoices Contract Prices Purchase Orders Customer Web Orders Your Store
BASIC CONCEPTS
THE WEBSPHERE INTERFACE TAB
On the Readysell main menu you will see a "Web Sphere Interface" tab. If you click this tab you should see a list of the most recent messages sent and received from WebSphere. These include successful messages as well as any errors or warnings.

This information is primarily for the purpose of Readysell support, however you may also view this tab for information about recent interactions between Readysell and WebSphere.
WEB IDS AND WEB CUSTOMERS
A customer in WebSphere can have multiple "Web IDs" associated with them. For example, one per purchasing officer. Each Web ID for a customer is linked to a single "Organization" in WebSphere. In most cases however an organization will only have a single web ID.
In order for the Readysell-Office Brands Integration to work, you need to link the Readysell Customer to both the Web IDs and the Organization of the customer. The mappings of the fields are as follows:
WebSphere Field |
Readysell Field |
Organization Name |
Web Customer |
Logon ID |
Web ID |
CREATING AND APPROVING A WEB ID AND ORGANIZATION IN WEBSPHERE
There are two ways to add Web IDs and Organizations into the Websphere Commerce Accelerator system. The easiest way of adding them is via the Registration option at the local store level. Once your client registers, it automatically creates the Web ID and the Organization at the same time. You simply need to approve their registration in the Organization Admin console.
In this manual, we will only be covering this first method. If you would like to explore the full range of options for WebSphere registration, please consult the Office Brands documentation at www.officenational.com.au/help[ |http://www.officenational.com.au/help]
STEP 1- REGISTER VIA STORE REGISTRATION PAGE
You or your customer can access the store regirstation page by going to your Office Brands WebSphere Commerce web site at http://www.officenational.com.au/yourstore or http://www.officeproductsdepot.com.au/yourstore
Once you are here, click on "Register" up the top right, you will get the following form.

Fill in the form and click "Submit"
STEP 2 APPROVE THE REGISTRATION VIA THE ORGANIZATION ADMIN CONSOLE
Log on to the Organization Admin Console at[ |https://www.officenational.net.au/orgadmin]{+}https://www.officenational.net.au/orgadmin+[ |https://www.officenational.net.au/orgadmin]then click "Approvals", then "Approvals Requests".
You will see a list of all users which are pending to be approved.

Click on the ID of the user. You will see an "Organization Approval Summary" and a "User Approval Summary".
Note: Copy the "Logon ID" and the "Organization" from the screen now so that you can easily paste it into Readysell later.
Click "Approve" at the top right, and then click "OK".
The user is now authorized to trade with your store.
Note: Using this process will create both a "Web ID" and a "Organization" for the new registration. If you want to add additional users to an organization, please follow the instructions available on the Office Brands Help Site.
ADDING WEB IDS TO READYSELL STEP 1 - FIND THE LOGON ID Note: If you copied the Logon ID into your clipboard during the approval process, you will be able to skip this step.
Log on to the Organization Admin Console at[ |https://www.officenational.net.au/orgadmin]{+}https://www.officenational.net.au/orgadmin+, then click "Access Management", then "Find Users".

In the "Parent Organization" field type customer's name and hit "Find" in the top right hand corner.

The Web ID will then be displayed in the "Logon ID" column.
STEP 2 SET THE WEB ID IN READYSELL
From the Readysell main menu, click "Customer" and find the customer and go to the "Contacts" tab. From this tab click "Insert".
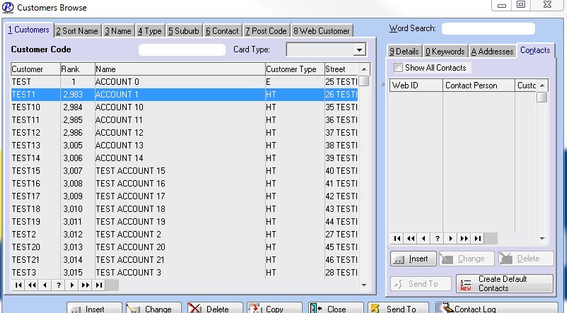
Fill in the Web ID with the Account ID from WebSphere Commerce Accelerator and add a name for the contact person then click "OK".

The Customer now has their Web ID added to their account.
ADDING WEB CUSTOMERS TO READYSELL STEP 1 - FIND THE ORGANIZATION NAME Note: If you copied the Organization Name into your clipboard during the approval process, you will be able to skip this step.
Log on to the Organization Admin Console at[ |https://www.officenational.net.au/orgadmin]{+}https://www.officenational.net.au/orgadmin+, then click "Access Management", then "Find Organization".
In the "Name" field type customer's name and hit "Find" in the top right hand corner.

The Organization Name will then be displayed in the "Name" column.
STEP 2 SET THE WEB CUSTOMER IN READYSELL
From the Readysell main menu, click "Customer" and find the customer. Click on "Change"
On the General tab, fill in the following fields: 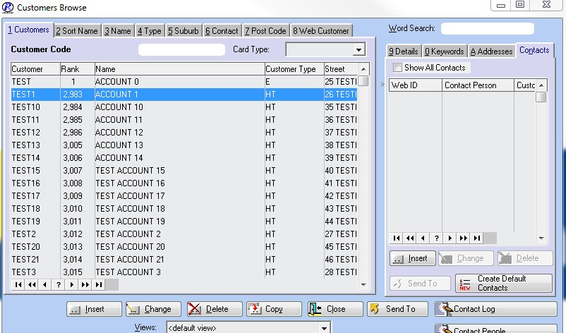
- Web Customer (Required) o The customer's Organization Name from WebSphere Commerce Accelerator into this field
- Web Cost Centre (Optional) o The cost centre code the customer uses when placing a web order
- WebSphere Approval Required (Optional) o Whether manager approval is required prior to orders being submitted through WebSphere (only applicable if the customer has contract pricing).
- WebSphere Approval Minimum Order Value (Optional) o The threshold at which the above manager approval is required.
Click "OK"

REPORTING ON WEB IDS AND WEB CUSTOMERS
To generate a list of customers and contacts that have Web IDs attached:
- Log into Readysell and enter the "Report Wizard"
- Go to Type "Customer"
- Highlight the "Contact People With Webid" report and click "Run Highlighted Report"
- Click "Close" on the "Select A Query For CONTACT" window
To generate a list of customers that have Web Customer fields populated:
- Log into Readysell and enter the "Report Wizard"
- Go to Type "Customer"
- Highlight the "Customer List Full" report and click "Run Highlighted Report" 4. "Select a Query for CUSTOMER" will appear, click on "New" to create a new query
- Click on the "Manual" button and paste in the following query:
CUSTOMER:WebCustomer IS NOT NULL and CUSTOMER:WebCustomer <> ''
- Click on "Finish"
- Click "Yes" for "Save Query"
- Enter "Web Customers Only" as the report name
- Click OK
PRODUCT INFORMATION AND IMAGE UPLOADS
Your WebSphere Commerce store has two kinds of products, Catalogue Products and Store Products.
Catalogue Products are created and maintained by Office Brands Head Office. You have no ability to change the names, descriptions or images on these products. You can however opt to take ownership of catalogue product pricing (please contact Readysell Support to set this feature up).
Store Products are created and maintained by members either via the WebSphere Accelerator Web Admin, or through Readysell.
Each evening, RObI checks for products in Readysell that have been changed during the day and uploads those changes to WebSphere. Products uploaded if they satisfy these conditions:
- The "Catalogue Product Flag" is turned OFF (signifying this is not an Office Brands catalogue product) AND the "Display on Website Flag" is turned ON
- The "Catalogue Product Flag" is turned ON (signifying this is an Office Brands catalogue product) AND there is a price entered into a "WebSphere Override" price level.
PRODUCT FIELDS
The following is a table of mappings between Readysell and WebSphere fields. Whenever any of the relevant Readysell fields are changed, a product is triggered to be updated on WebSphere.
Readysell Field |
WebSphere Field |
Notes |
Product Name |
Display Name |
|
Product Code |
Part Number |
|
Sales Notes |
Long Description |
|
Sell Unit |
Unit of Measure |
|
Cost Price |
Cost Price |
|
Sell Price 1 |
List Price |
|
Sell Price x |
List Price with Quantity Breaks |
Quantity breaks are uploaded if they are defined in Readysell |
Sell Price y* |
Government Price |
You can configure the Readysell price level that is mapped to the WebSphere Government catalogue. Please contact Readysell if this is not set up correctly for you. |
Sell Price y* |
List Price |
A level can be specified as a "WebSphere List Override" level. Any price on this level (whether for Catalogue Products or Store Products) will override the list pricing on WebSphere. |
Sell Price y* |
Government Price |
A level can be specified as a "WebSphere Government Override" level. Any price on this level (whether for Catalogue Products or Store Products) will override the government pricing on WebSphere. |
Category |
Category |
All subcategories must be blank in Readysell for category to be mapped. Deepest level category should be used. |
* The price level actually used can be set up by a Readysell Support team member.
EDITING THE NAME AND DESCRIPTION OF STORE PRODUCTS
To edit the product's web name, simply edit the name of the product in your Readysell product file. To edit the product's web description, edit the Sales Notes field. Your changes will be uploaded to WebSphere overnight.
CATEGORISING YOUR STORE PRODUCTS 
Note: At the moment, you can only categorise Store Products into categories you have created yourself in WebSphere Commerce Accelerator. The ability to place Store Products into catalogue categories will be available in the future.
By default, all Store Products are uploaded into a category called "Store Products" on your WebSphere Commerce store. To move a product into a WebSphere Commerce category, first, you must find the lowestlevel category in the category tree you want to place it in.
For example, to place the product in the below category you MUST use "Enviro 100% Recycled Envelopes", NOT "Recycled Envelopes", "Envelopes" or "Office Supplies".

Copy the name of the category (in this example Enviro 100% Recycled Envelopes) and then go to the product in Readysell. Go to the "Notes 2" tab and paste the category name into the "Category" field. Then, make sure all of the sub categories are blank.
IMAGE UPLOADS 
To upload an image for your store product, place the image with the appropriate file name in your IMAGES directory. For example, if the product code is AA1000 ensure an image named AA1000.jpg, AA1000.gif or AA1000.png is in your IMAGES directory.
The location of your image directory is located at the top of the Readysell main menu.
CHECKING PRODUCT UPDATE STATUS 
You can check the status of your product update (whether or not it was successfully sent to WebSphere) by clicking the "Web Status" button on the "Stats" tab in the product site browse.
FORCING A FULL UPDATE 
Occasionally Readysell Products and WebSphere products can fail to sync correctly. In these cases it is usually easiest to force a "Full Update" to occur. This works best if all of your Store Products are deleted from WebSphere Commerce Accelerator.
Once this is completed, please contact Readysell support and we will run a script to upload all your Store Products back to WebSphere Commerce in bulk.
GETTING A LIST OF STORE PRODUCTS
Occasionally, you may want to get a list of your store products in Readysell. To do this, you will need to create a new report by following these steps:
- Log into Readysell and enter the "Report Wizard"
- Go to Type "Products"
- Highlight the "Product List" report and click "Run Highlighted Report"
- "Select a Query For PRODSITE" will appear, click on "New" to create a new query
- Click on the "Manual" button and paste in the following query:
PRODSITE:DisplayOnWebSiteFl = 1 and (Prodsite:CatalogueProductFL is null or Prodsite:CatalogueProductFL = 0)
- Click on "Finish"
- Click "Yes" for "Save Query"
- Enter "WebSphere Store Products Only" as the report name
- Click OK
Your new report will the display on the screen. As usual, you can send it to the printer or Excel by using the "Send To" button. For more information about using the Report Wizard, please consult the documentation available at our[ |http://www.readysell.com.au/files/Readysell%20Version%207/]Support Downloads site.
CUSTOMER INVOICES
When you finish creating a new invoice in Readysell for a customer that has a Web ID, the invoice is automatically uploaded to WebSphere by RObI so that customer can view the invoice when they log in.
You will see this screen when an invoice upload has just taken place.

Note: You will still see this screen even if you are working on a test database, however you will see an orange warning message instead. This is to indicate that the invoice was NOT uploaded.
Once the invoice is uploaded to WebSphere Commerce, the customer will be able to view it in his account. It will appear as follows.

CONTRACT PRICES
RObI uploads contracts to WebSphere Commerce overnight. Any changes you make to contracts will take effect in WebSphere Commerce the next day.
RObI will calculate prices for each product based on the contract rules in Readysell (including markups, discounts and fixed pricing rules) and then upload this calculated price to WebSphere.
CONTRACT PRICING IN READYSELL
- Setup contact prices by customer type where ever possible. That way a single contract price applies to all customers in the customer type. This greatly reduces the effort required to maintain contract prices as there are a lot less contract price rules. The older style arrangement where prices are setup one at a time for customers and products results in a lot more maintenance work ,
- Setup a number of customer types on your system. For example customer types A, B and C.,
- Assign one customer type to every customer,
- Only use contract prices for one product and one customer where doing so is essential.
For more information on how to setup contact pricing in Readysell, please refer to Readysell Contract Pricing document available at www.readysell.com.au/files[ |http://www.readysell.com.au/files/]
CONTRACT PRICING INTEGRATION RULES
Unfortunately not every type of contract can be uploaded from Readysell to WebSphere Commerce.
The following types of contracts are supported:
- Customer + Product Fixed (Specific Retail) Price
- Customer + Product Markup / GP%
- Customer + Product Discount
- Customer Type + Product Fixed (Specific Retail) Price
- Customer Type + Product Markup / GP%
- Customer Type + Product Discount
Contracts that apply to entire departments or the entire catalogue will not be supported at this stage. If you wish to load these types of contracts, you will need to create them manually in WebSphere Commerce Accelerrator, for information on how to do this, please refer to www.officenational.com.au/help[ |http://www.officenational.com.au/help/]
CUSTOMER WEB ORDERS
When a customer places an order on your WebSphere Commerce store, the order is automatically sent to your Readysell application through ESB and RObI. When it arrives in Readysell, it will have one of two transcodes, SALWEB or SALHLD.
Orders that are SALWEB have passed all checks and are ready to be picked.
Orders that are SALHLD have one or more issues that need to be addressed before they are ready to be picked.
ORDER IMPORT SETTINGS
There are a number of settings that can be toggled to ensure that orders are imported into Readysell in a manner which suits your business best. You can contact Readysell to change any of these settings at your store.
Setting |
Description |
Always Use Readysell Product Description |
Overrides the product description sent from WebSphere with the description on the product file in Readysell. |
Always Use Customer Delivery Address |
Overrides the delivery address sent from WebSphere wtih the delivery address on the customer file in Readysell. |
Hold Orders With Hold Notes |
Always sets an order to 'SALHLD' when there is a note in the NOTES2 field on the customer file in Readysell. |
Web Orders Register for Sales |
Sets the Readysell Register to use for Web Orders. |
Print Picking Slips |
Automatically print the picking slips for orders that arrive as SALWEBs |
Reprice Lines |
Overrides the prices sent from WebSphere with prices calculated from the product file and contract prices in Readysell. |
Import On Flags |
Enable and disable order importing on a PC by PC basis. |
PROCESSING A HELD ORDER
If an order comes in as SALHLD, you will need to diagnose why the order was held in order to correct the issue and process the order. There are a number of issues that can cause an order to be held, these are:
- Unable to find the customer's web ID in Readysell
- Customer has notes in the NOTES2 field (if the "Hold Orders With Hold Notes" setting is enabled)
- Unable to find a product in Readysell
If there the Web ID is not recognised, follow the instructions on Page 6 of this manual to link the appropriate Readysell customer to the Web ID. Future orders from this web ID will automatically be linked to the correct customer.
If the product could not be found in Readysell, either fill in the correct Product Code on the line, or delete the line.
HOLDING ORDERS FOR SELECTED CUSTOMERS
By turning on the "Hold Orders With Hold Notes" setting, you can hold web orders for specific customers. Customers with contents in their "Notes 2" (popup notes) field will be held until they are manually convereted to a regular sale.

DISPLAYING CUSTOMER NOTES ON PICKING SLIPS
When a customer places an order via the internet they may add notes to the order. While customer notes are already placed in the Sale Header notes and Sale Line notes of the order, some members like these to be displayed on picking slips.
If your store is not seeing these notes on their picking slip and you would like to, please contact Readysell and we can add them to your layout.
TECHNICAL ASPECTS
ARCHITECTURAL OVERVIEW

ROBI PLATFORM
RObI runs as an ASP.NET application on top of a Microsoft Internet Information Server (IIS). RObI has been tested on Windows XP, Windows Vista, Windows 7, Windows Server 2003 (including R2) and Windows Server 2008 (including R2).
ROBI WEB INTERFACE
If you access http://SERVER_HOSTNAME:8092/ from the internal network (and log in using the server's Administrator username/password) you will be presented with the following screen.

This is the RObI web interface and will provide you with access to the following features:
- Service List
- list of the accessible web service triggers and providers of RObI.
- Log Viewer
- real-time viewer for the RObI log file as well as access to the log files directory. This directory contains the log files for the last 30 days as well as all of the XML messages sent and received by RObI.
ROBI CONFIGURATION
RObI is configured in two places.
- Readysell System References
RObI pulls various configuration data from the Readysell system reference table. The bulk of the configuration pertinant to RObI can be found under the "WEB" system type.
- Web.config
The ASP.NET web configuration file contains a number of configuration variables required for RObI. A description of the function of most of these flags can be found in this user guide. This file also contains the "Installation Path" and flags to turn on and off each of the integration features.
OTHER INTEGRATIONS
Aside from the integrations listed in this manual, there is also some anxilary data transferred between Readysell, Office Brands and your store which is currently not handled by the RObI or ESB systems. These integrations may be considered for addition into the web services architecture at a future date.
CATALOGUE LOADS
Catalogue loads are currently distributed from Office Brands head office to Readysell. Readysell then distributes this data to each Readysell system where it can be loaded by members at a time of their own choosing.
IMAGE UPDATES
Office Brands catalogue image data is currently updated by Readysell when new images are released. Image can also be manually updated by members by overriding the existing images in the IMAGES directory.