/
Configuration
Configuration
- Monica Chand (Deactivated)
- Shannon Ball
- Van Ho (Deactivated)
Owned by Monica Chand (Deactivated)
Last updated: Aug 07, 2017 by Shannon Ball
Configuring/Pairing Opticon OPN2005 Barcode Scanners
- Turn on Bluetooth mode on the tablet
- There is a quick start guide paper with barcodes.
- Scan Step 1
- Hold the Clear/ Function key for about five seconds, until it beeps and the LED begins flashing blue
- On your tablet/ phone go to the bluetooth settings and scan for devices
- Have it discover your OPN2005, select the OPN2005.
- Once chosen, the OPN2005's laser will light up and you will hear a steady beep.
Your OPN2005 is now paired and connected. The LED blinks blue slowly to indicate a connection is active and working.
If for any reasons your OPN2005 becomes disconnected with your other device (e.g., host device goes into sleep mode, battery loss), you can simply hold the scan key for five seconds to re-establish the connection
Click Here to Print out Quick Scan
Configuring Portable Scanner for IOS Devices
To program this portable scanner to be used with an IOS devices, please use the following steps:
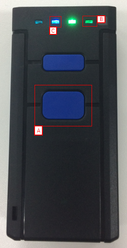
- Start Bluetooth Scanner (The Scan Button [A]), Ensure the Bluetooth is active on the IOS device. Press and Hold the Scan button for 8 seconds until the blue light in the top right hand corner [B] is flashing. This will active pairing mode to allow the operator to connect the device.
- Open the Bluetooth device list and allow the device to find the scanner called “General Bluetooth HID Barcode”.
- Click on the Bluetooth device in the list and allow the scanner to the connect in the device.
- If completed Successfully, the light in the centre left will light up blue [C].
- Once the connection has been established, scan the barcode label “IOS show Hidden Keyboard” in the manual. (As shown in the screenshot shot below)

If you have completed these steps successfully, when the operator opens notes or Readysell, the onscreen keyboard should appear on the screen and the operator can scan a barcode in the line.
Readysell to configure file paths for Signature images used on the mobile app
- Open Readysell Windows version then click on Tools>Images Folder
- To see the Signatures file path click back on the folder there will be a list of folders e.g., ABA, Attachments, ProductImages, Signatures
- The file path you need is the Signatures e.g., \\Servername\Readysell.Files\Signatures
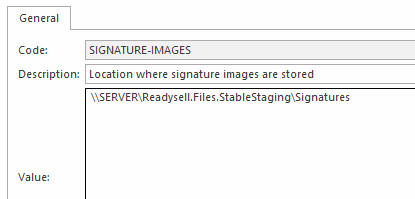
- From the Navigation panel click on Administration>Advanced>System Types then click on FILE-PATH
Locate Code SIGNATURE-IMAGES then key into the Value the file path name
- Click on Save.
- Click on Tools then Restart Service to effect the change.
, multiple selections available,
Related content
Setting up SmartFreight integration
Setting up SmartFreight integration
More like this
Installing Tyro on a workstation.
Installing Tyro on a workstation.
More like this
Honeywell EDA51 Android 10 Upgrade
Honeywell EDA51 Android 10 Upgrade
More like this
Sale Shipment Picking
Sale Shipment Picking
More like this
Mobile Android App Manual Updates
Mobile Android App Manual Updates
More like this
MYOB - Account Right - Integration
MYOB - Account Right - Integration
More like this