...
- Tick the "Gen Machine" checkbox when you are finishing a sale
Expand title Show me.. 
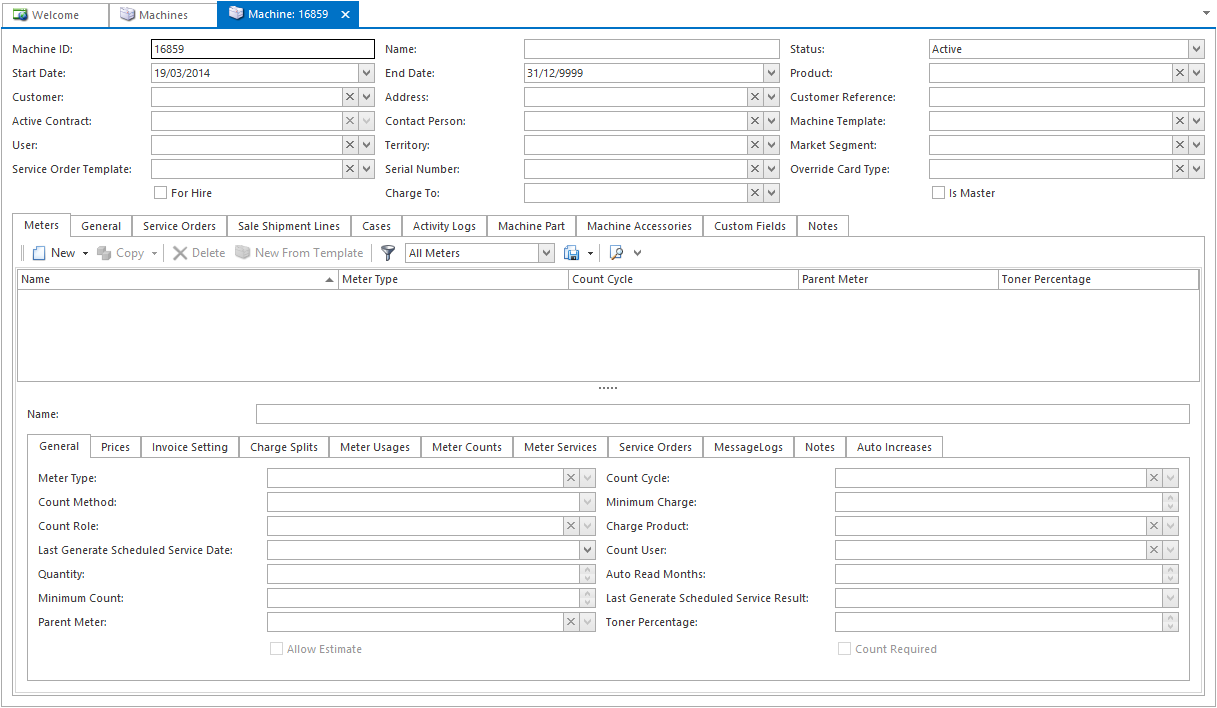
Click on the "New" button at the top right of your Readysell when you are on the machine tab or click the arrow below the new button and select "machine".
The field of 'Status' is one of the fields that determine if the Machine will be part of a Meter count run and Meter charge run.
If the Status of a Machine is not equal to Active, that machine will not be part of any meter count run extract or meter charge run.
When you click on New to create a new machine, Machineid Machine-id is a unique number that is auto-populated (can be changed), Status = Active (can be changed), Start Date = set to today's date and End Date = set to 31/12/9999 (can be changed)
There is a newly created field called 'machineIdNumericMachineIdNumeric. The field is useful for when you wish to sort by machine-Id. The MachineId Machine-Id is copied into this field and will sorting sort numerically. If a machineid between with machine-id has an alpha letter, that alpha letter is not copied into the machididnumeric field.Expand title Show me.. 
- Click on the "Copy" button near the top left of your Readysell screen when you are on the machine list view after highlighting a machine which is like the machine you want to create. This is a fast way of creating machines. You just change the details that are different.
...
| Note |
|---|
In the list view of Machines. You can sort by MachineIdNumeric field. Once you click on Save after creating or copying over a machineidmachine-id, the system will prepopulate the machine-id into a field called 'MachineIDNumeric'. If a machine-id has a preceding alpha code Eg A123machine-id, the alpha letter is thrown away and only the numeric number is copied over to this field. Rule: If there is a number in the machined then any or all of the numbers in the machined should populate over to the machineidnumeric field. If there are no numbers in MachineId then the machineidnumeric field will be null. |
...
Click on button New to create a new machine. The Machine screen displays. The machineid machine-id is a unique number, status = Active (if you wish to do a meter count run and meter charge run)
- Enter details for the machine:
- Enter a Machine ID or use the automated allocated number as the Machine ID
- Enter a Machine Name
- Enter a Start and end date of the machine contract. By default, this is set to today's date.A year of 9999 indicates an open-ended contract.
- Enter a Product for this machine (mandatory field)
- Search and select the Customer
- The Address will auto fill from the customer's card file. If this is not the correct address, select an address and ensure this address is flagged as 'Physical'
- The Contact Person will auto fill from the customer's address on the card file. If this is not the correct contact, select the contact and ensure the contact is flagged as 'Service'.
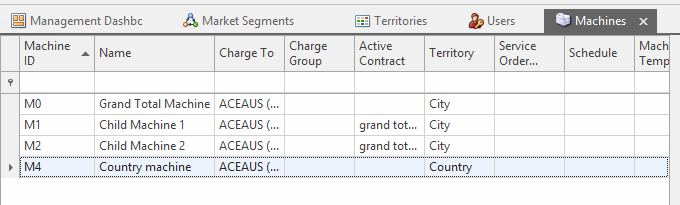
Select the Territory. See link to Territories
Warning Technician performance reporting depends on each machine being in the correct territory. Once you have setup set up your machine, assigned assign a territory and save the machine. Review the territory of this and similar machines as shown on the machine list view below:
- Select the Market Segment (this is the efficiency of the machine). This is where you can set KPI on machines. see link Market Segments
- Enter a Machine ID or use the automated allocated number as the Machine ID
- Enter the Parent meter for the machine. A single machine can have a number of meters.
- On the General tab
- Click on button New
- Enter in the meter name as Machine Total
- Select a Meter Type of Machine Total
- Select a Count Cycle (standard is fine) Machines can be broken up into Count Cyles
Select a Count Method - Key in a Minimum Charge (if there is to be one)
- Select a Charge Product that will appear on all invoices for the meter. The product code should indicate the type of meter. For example on all black and white meters the product might be "MonoCopyCost", on colour meters the product might be "ColourCopyCost". The code and description of this product shows on meter charge invoices sent to the customer when you charge out meter charges at the end of each month. You do not need a different product code for each meter. The product code should be the same on all mono, colour etc. meters. Each machine needs a product code to define the model of the machine, but meters should share common product codes by meter type. You can set defaults on the meter type to enforce standards and save time when setting up meters in future.
- Key in the Auto Read Months quantity to read as 3 or whatever quantity of months you want the system to automatically read if you get no read results manually
- Key in the toner % you want the minimum to be before you want your service staff to relace the toner
- Prices tab - do not fill this in for a parent meter
- On the Invoice Setting tab
- Select the Minimum Charge Run Type.
For Minimum usage types - If it is set to 'In Advance' the invoice date is the start date of the Period
For Minimum usage types - If its it is set to 'In arears' the invoice date is the end date of the period
For Variance usage types - it always uses the end date of the period - Key in the quantity of the Minimum Charge Run Cycle
- Key in the Next Minimum Charge Run Period in YYYYMM format
- Key in the quantity of the Variance Charge Run Cycle
Key in the Next Variance Charge Run Period in YYYYMM format
Info Next Variance Charge Run Period of the Parent Meter and the current system date are is used to determine the setting of the Meter Charge Overdue flag.
* Meter Charge Overdue is set to
") if the current system date is greater than the Next Variance Charge Run Period
if the current system date is greater than the Next Variance Charge Run Period Tip Click on
 button to change the Next Min Charge Run Period and Next Var Charge Run Period to an open period.
Expand title Show me 
- Select the Minimum Charge Run Type.
- Enter the (child) meters for the machine (can only be done after the parent meter is set up)
- Click on button New
- Click on arrow button next to parent meter of Machine Total
- left Left-click on the a blank line below the parent meter to begin entering in the individual meter
- On the General tab
- Enter in the meter Name
- Select a Meter Type of Machine Total
- Select a Count Cycle (standard is fine)
- Select a Count Method
- Key in a Minimum Charge (if there is to be one)
- Select a Charge Product of CopyChargeTotal or similar
- Key in the Auto Read Months quantity use when estimating a meter count
- Key in the toner % you want the minimum to be before you want your service staff to relace the toner
- Select the Parent Meter as this machine's Machine Total
- Make sure the Count Required check box is flagged
- Check Email Count Required flag if copy count request email are to sent to customers
- On the Prices tab
- Key in the quantity break pricing (i.e. 0-10,000 = $0.02 a copy / 10,001 - 100,000 = $0.01 a copy / etc)
- On the Charge Splits tab
- Use this tab to split up any of the charges for this meter if they are to be split between different customers for the same machine
- On the Auto Increases tab
- Auto Increase Last Increase Date
- Auto Increase Months
- Auto Increase Minimum Charge Percentage
- Auto Increase Price Percentage
- To enter any other child meters (i.e., black and white / etc) follow steps in point 4)
- When you have finished, click Save.
- Set the charge period of the machine by highlighting the new machine in the machine list and clicking on the "Set Charge Period" button near the top middle of the screen.
Note: Once you click on Save, the system will prepopulate the machine-id into a field called 'MachineIDNumeric. This field is useful for when you wish to sort by the machined numerically. If a machine-id has a preceding alpha code Eg A123machine-id, the alpha letter is thrown away and only the numeric number is copied over to this field.
If the machine-id is a complete alpha then the machineidnumeric will be null.
Rule: If there is a number in the machined then any or all of the numbers in the machined should populate over to the machineidnumeric field. If there are no numbers in MachineId then the machineidnumeric field will be null.
| Expand | ||
|---|---|---|
| ||
|


| Warning |
|---|
After you create a new machine. Make sure you click the "Set Charge Period" button near the top of the screen and set the charge period to the first month you want to charge the machine. Normally the current month. |
Adding Machine to a contract
- Once you have saved the newly created machine, you can add this machine to an active contract.
- Click on "add to contract' in the ribbon
- A window will pop up for you to select a contract to add the machine to.
If you need to remove this contract from the machine, you can select another contract or go to the contract and remove that machine-id from the contract
| Expand |
|---|
|

