Overview
Scan checking is the most efficient and accurate method of receiving goods. At the point of receipt, you can scan each line on a receipt to check that the cartons contain the correct goods. This saves you having to count each product received, find the line on the receipt and adjust quantity as needed. As you scan lines, they start as light red in the system and become green when all of the correct goods have been scanned.
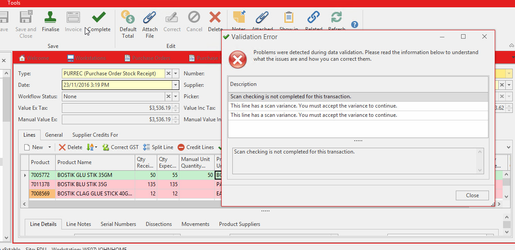
While scan checking is very fast. It is also based on the idea of positive confirmation. You can only accept a line if you have made some change to the line. This means you have to delete lines that are not received or enter a manual scan quantity of zero on the line. The speed penalty of positive confirmation is worth the extra time required due to greater accuracy. Workstations can be set to a lower level of validation by using view mode in your workstation setting. View mode is faster but relies the user visually checking the colours displayed on the line rather than physically blocking updates until all lines are checked and accepted.
This feature requires a bluetooth or USB scanner set up to run in serial mode:
- If scan checking is turned on for the workstation, when you click on the "Receive" button on purchase orders or open an existing purchase receipt. All the lines start off being displayed in red
- If the lines on the purchase receipt are not coloured, then purchase receipt scan checking has not yet been turned on for your workstation
- Start scanning the outer bar codes on the cartons containing your products. Some of your stock will be delivered in outer cartons that contain a number of individual items. Try to avoid openning cartons and scanning individual products for products that you stock individually. It is a lot faster to scan the outer bar codes on boxes and cartons
- You will need to capture the outer barcodes on the boxes. See creating alternate bar codes section of the product general tab section of the product user guide
- If the bar code you scan matches a product on the purchase receipt the colour of that product's line on the purchase receipt will change
- Each purchase receipt line has:
- A quantity expected, that shows how much we expect to receive. The quantity expected is the quantity still ourstanding on the purchase order line. It may be less than the quantity origionally ordered if a previous receipt has already supplied part of the line
- Quantity scanned is compared against quantity expected to work our if there is any variance on the line. Quantity scanned can be increased by scanning bar codes on products. Once you have scanned a barcode you can't unscan it. So you need manual adjustment to handle such situations
- Manual quantity scanned, you can type in the quantity into the quantity scanned column. If the manual quantity scanned field has anything in it, the system uses the manual quantity scanned for that line
- If there is too many items to scan, scan one of each to confirm you have the correct stock and use the manual scan override entry column to manually key in the actual number of products you actually are supplying that is on hand as of right at that moment and intended to scan. i.e. you are supplying 100 of product A. Scan product A to make sure it is the correct product, then knowing that you have the further 99 of the stock, manually key in 100 into the manual scan override field.
- Lines a red if the quantity scanned is zero, orange if the quantity scanned is greater than zero and less than the quantity expected, green if the quantity scanned is equal to the quantity expected and becomes red again if the quantity scanned is greater than the quantity expected
- If you scan in a bar code that does not exist on Readysell a purchase receipt line is created showing you the error
- If you scan in a barcode for a product that does exist in Readysell, but which is not on the purchase receipt, a new line is added to the purchase receipt
- If you are part way through the scan check, you can use the Save and Close button to save what you have done and pick up the job later on or the next day and finish when you are ready to.
- When you are finished scanning :
Use the Accept Scan Variance button where the quantity scanned does not match the quantity on the purchase receipt before you hit the Finalise or Complete button.The quantity received will be adjusted to match the quantity scanned (or manual scanned). You can then process you receipt as normal.
There are good reasons why you can't accept a scan variance on a line you did not receive without either typing in a manual quantity received of zero or deleting the line from the receipt. Scan checking is based on the concept of positive confirmation (When scan checking with your workstation set to the recommended required mode). You have to take some action on every line for that line to be regarded as checked. You have to either scan a quantity quantity/ type a quantity into the manual quantity scanned column. Then accept any variances. In the alternative you can delete the receipt line. You can't accept a line that you have not changed. As doing so would make it easy for you to just miss a line that really was part of the delivery and accept the variance. You have to physically confirm that zero was received by typing zero in the manual quantity scanned column for that line to be regarded as checked or delete any lines that have not been received.
If you want to be able to process a receipt with scan checking, but accept lines even if they have not been checked or deleted. Have you workstation's scan checking mode set to view. That way the lines will colour code. But you can accept the receipt without having to agree to all scan variances. You can process the receipt even if some of the lines are not showing as green.
If the receipt has a lot of lines say 100 and you only want to receive a few of the lines. Best practice is to delete the lines that you did not receive and to have your workstation set to required scan check mode. If your workstation is set to scan check in required mode. You have to actually delete the lines you are not receipting or type 0 into the manual quantity received column. Use Readysell standard selections like CTRL/A to sell lines then CTRL/Click to deselect the lines you want to keep. Once the lines you are not receipting are highlighted. Click the delete button just above the list of lines to delete them. That way you will not get a warning/error around the line you have not receipted still having a scan variance. You have deleted the lines instead of using the Accept Scan Variance button to just clear the quantities from those lines.
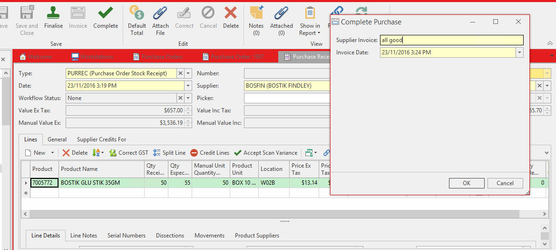
Once you have accepted the variance (if any), select to either Finalise (delivery docket only affects stock on hand not invoice) or Complete (which affects both stock on hand and invoice) to finish the process.
See also:

