Office Brands marketing automation (MAX) and CRM integration
Office Brands are working alongside Readysell to help the office brands members easily gain a list of each members' customer contacts so that Office Brands can then send out emails automatically to those contacts on the members' behalf.
The contacts live on the right hand side of the Customer's Browse window. Any contacts in the right hand side that do not have the flag on for Opt Out Of Automated Marketing will be sent to Office Brands head office every Sunday and Tuesday night to be used for Automated Marketing.
Each Office Brands member will need to follow the instructions below, tidy up their data and then notify Haaris at Office Brands head office when they are ready for the Automated Marketing to start using their contacts list.
Rules
- Readysell will add the Roles and and Types of Business for you if you wish us to do so. If you do, please contact Readysell before getting started on this.
- All changes to contact details must be done in the customer file. (Not the contacts area in the right hand side of the Customer Browse). Any changes you do in the customer file to the contacts, will then upload to the contacts area on the customer browse when you run the button Create Marketing Automation Contacts.
- If you want to update the contact in the customer browse (right hand side) and don’t want this updated by the actual customer file, make sure you remove the related note out of that contact in the contact itself, turn on the flag for Opt Out of Office Brands Marketing and if applicable – add in the Web ID for that Contact. I.e. select contact, click on button Change, click on tab 2 Notes, remove note that reads as Generated from card contact, on Tab 1 General tick the flag for Opt Out, add in the Web ID into the Web ID field.
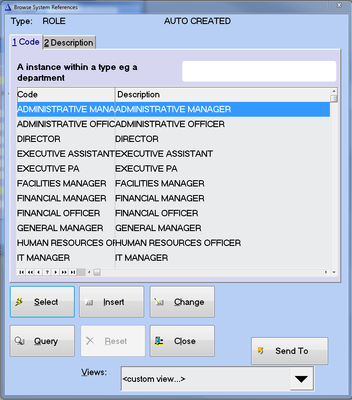
Job Title / Business Role - Set up in System References – Roles
Readysell Main Menu, System Administration, key in the word Roles, hit Enter on your keyboard, button System Reference Codes
- Type: ROLE
- Code: Short Code of the role
- Description: the full description as below
- Value: leave as 0
Readysell can set up these roles for you by running a script to populate these system references. Please contact Readysell if you would like this done for you.
Otherwise the following Roles will need to be set up within this system reference:
- Owner/Partner/Managing Director / Director / General Manager
- Administrative Manager / Officer/Office Manager
- Executive Assistant / PA/Receptionist
- Financial Manager / Officer
- Purchasing Manager / Officer
- IT Manager / Officer
- Human Resources Officer
- Facilities Manager
- Other
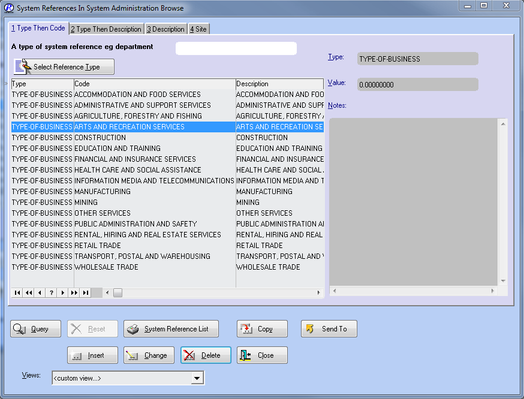
Industry Classification Setup – Set up in System References – Type of Business
Readysell Main Menu, System Administration, key in the words TYPE-OF-BUSINESS, hit Enter on your keyboard, button System Reference Codes
- Type: TYPE-OF-BUSINESS
- Code: Short Code of the type of business
- Description: the full description as below
- Value: leave as 0
Readysell can set up these roles for you by running a script to populate these system references. Please contact Readysell if you would like this done for you.
Otherwise the following Roles will need to be set up within this system reference:
- Agriculture, Forestry and Fishing
- Mining
- Manufacturing
- Electricity, Gas, Water and Waste Services
- Construction
- Wholesale Trade
- Retail Trade
- Accommodation and Food Services
- Transport, Postal and Warehousing
- Information Media and Telecommunications
- Financial and Insurance Services
- Rental, Hiring and Real Estate Services
- Professional, Scientific and Technical Services
- Administrative and Support Services
- Public Administration and Safety
- Education and Training
- Health Care and Social Assistance
- Arts and Recreation Services
- Other Services
Set up in System References – Check Contact Job Description
A new system reference, type “CUSTOMER” code “'CHECK-CONTACT-JOB-DESCRIPTION'” was added. If the value is 1 and you enter a job description. The system will check it exists as a code on the list of “ROLES” in the system reference file. You will need to set up this system reference first time around.
Readysell Main Menu, System Administration, key in the word Customer, hit Enter on your keyboard, button System Reference Codes and click on button Insert
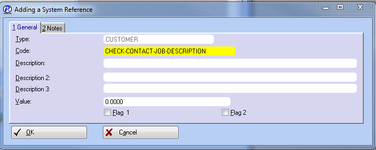
Add into the code field CHECK-CONTACT-JOB-DESCRIPTION
- Value 0 means do not check the Job Description in the customer file against the Job Descriptions listed in the system reference file.
- Value 1 means do check the Job Description in the customer file against the Job Descriptions listed in the system reference file.
Click on button OK to save.
Customers Module setup
What must be filled in…
- Contact People [in relevant level/s to be used on tab 2 General (Cont.)]
- Job Description [in that relevant level/s to be used on tab 2 General (Cont.)]
- Email Address [in that relevant level/s to be used on tab 2 General (Cont.)]
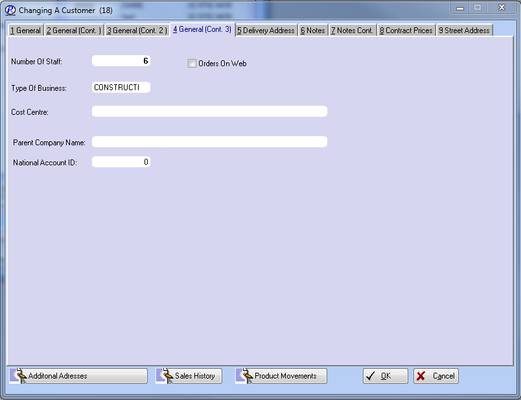
- Number of Staff [on tab 4 General (Cont. 3)]
- Type of Business [on tab 4 General (Cont. 3)]
Rules (reminder)
- All changes to contact details must be done in the customer file. (Not the contacts area in the right hand side of the Customer Browse). Any changes you do in the customer file to the contacts, will then upload to the contacts area on the customer browse when you run the button Create Marketing Automation Contacts.
- If you want to update the contact in the customer browse (right hand side) and don’t want this updated by the actual customer file, make sure you remove the related note out of that contact in the contact itself. I.e. select contact, click on button Change, click on tab 2 Notes, remove note that reads as Generated from card contact, on Tab 1 General tick the flag for Opt Out, add in the Web ID into the Web ID field.
From the Readysell Main Menu, click on button Customers
Select the customer to update and click on button Change
Your customer file has 4 fields each for Phone Number, Fax Number, Contact Name, Job Description and Email Addresses.
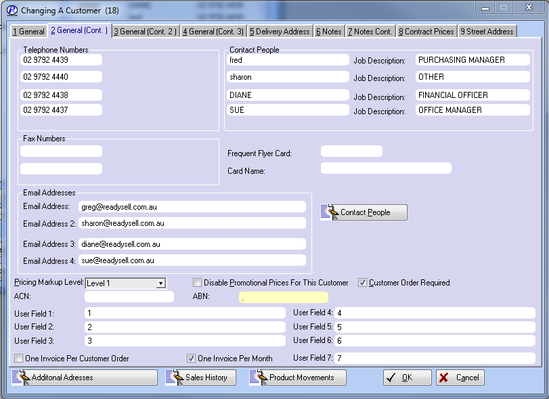
Decide which level/s contact and email address/es you will be using for the Office Brands Marketing. Tidy up the data as best you can.
What must be filled in automated marketing…
- Contact People [in relevant level/s to be used on tab 2 General (Cont.)]
- Job Description [in that relevant level/s to be used on tab 2 General (Cont.)]
- Email Address [in that relevant level/s to be used on tab 2 General (Cont.)]
Readysell does have the ability to mass change existing Roles and Job Descriptions in your customer files, please use pages 10 – 14 if you wish to use these functions.
What must be filled in for automated marketing…
- Number of Staff [on tab 4 General (Cont. 3)]
- Type of Business [on tab 4 General (Cont. 3)]
Readysell does have the ability to mass change existing Roles and Job Descriptions in your customer files, please use pages 10 – 14 if you wish to use these functions.
Click on button OK to save changes
Report to only view Customers before/after changes are made
From the Readysell Main Menu
Click on button Report Wizard
Select CUSTOMER (from the Show Only Report Type drop down)
And scroll down to the report called CUSTOMER CONTACT REVIEW
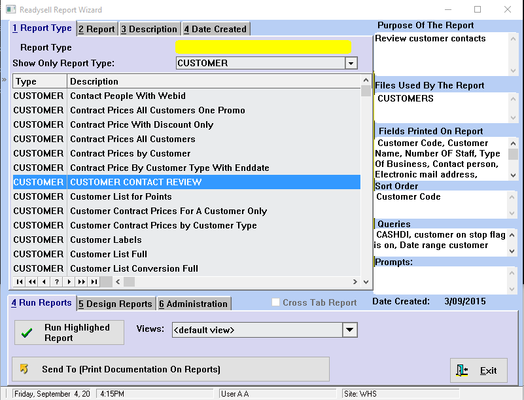
On tab 4 Run Reports
Click on button Run Highlighted Report
Query prompt opens – you can close this query window if you want all customer contacts.
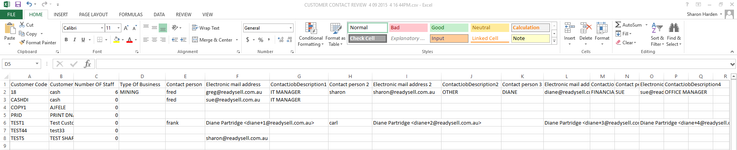
Report appears to screen and automatically goes to Excel
This report cannot be reimported back into the customer file. It is just for viewing purposes as a report.
Mass Changes to Customer Job Descriptions and Type of Business
Readysell has added the ability for you to mass change your customers’ Roles (Job Descriptions) and Industries (Type of Business) inside the customer file
These buttons affect all customers not just the customer you have selected at the time.
There are 2 new buttons on the Customer Browse window for you to do this on.
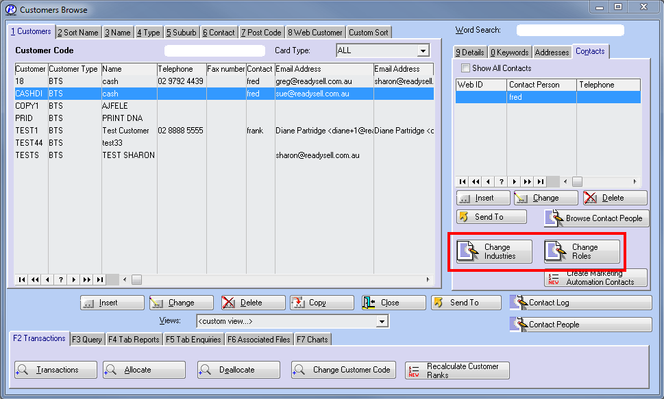
Mass changing Type of Business (Industries)
Click on button Change Industries (Contacts tab – right hand side of the Customers Browse window)
Number of Customers columns shows the number of customers with that Job Description.
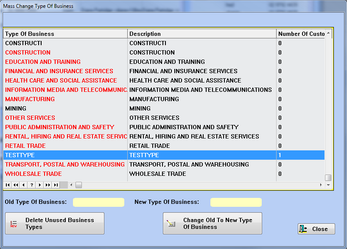
Key in the Old Type of Business as the one you wish to mass change from
Key in the New Type of Business as the one you wish to mass change to
Click on button Change Old To New Type Of Business
Use the Delete Unused Business Types button to remove out any Types that have a 0 in the Number of Customers column.
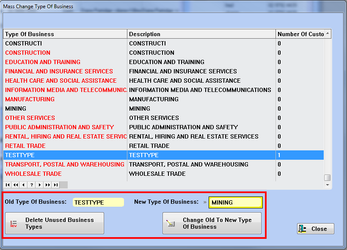
The Number of Customers update according to what you have just changed.
Mass changing Job Descriptions (Roles)
Click on button Change Roles (Contacts tab – right hand side of the Customers Browse window)
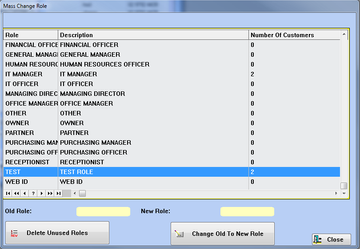
Number of Customers columns shows the number of customers with that Role.
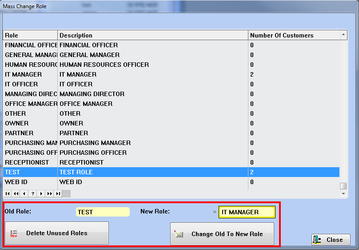
Key in the Old Role as the one you wish to mass change from
Key in the New Role as the one you wish to mass change to
Click on button Change Old To New Role
Use the Delete Unused Roles button to remove out any Types that have a 0 in the Number of Customers column.
The Number of Customers update according to what you have just changed.
Running and reviewing the Update Contact process
Then back on the Customer Browse window - to the right hand side is the tab called Contacts.
On this tab is a button called: Create Marketing Automation Contacts
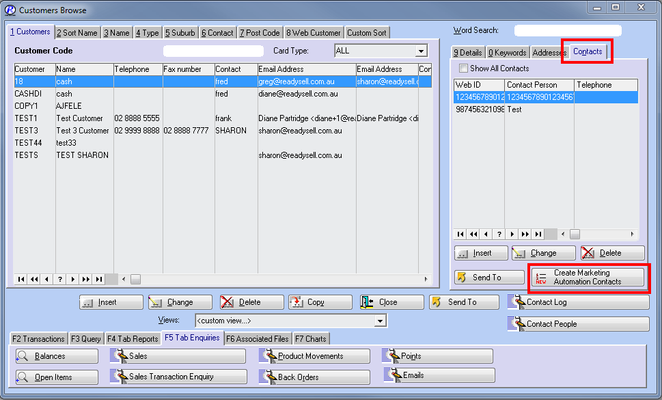
Click on button Create Marketing Automation Contacts
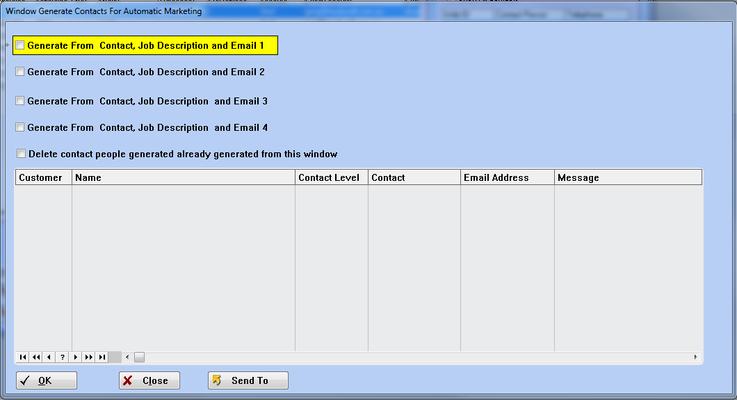
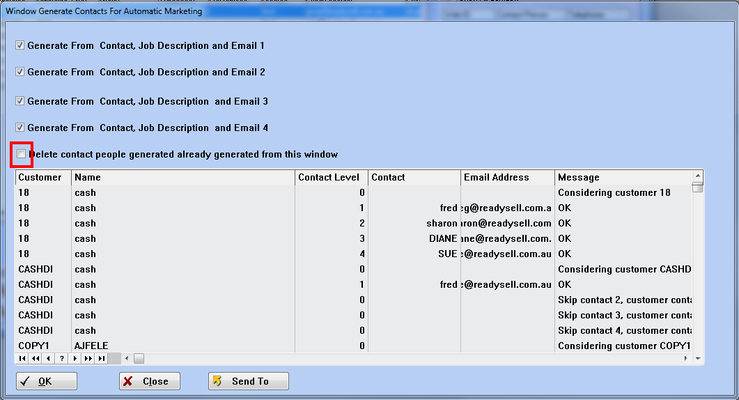
Flag each box that best represents the levels in the customer which are to come across to your contacts list and be used by the Office Brands Marketing, then click on button OK
If you then realise you've made a mistake, you can use the last flag for "Delete contact people generated already generated from this window" and click on button OK and it will undo the previous task.
Once you click on the button Close it takes you back to the customers browse window. The screen does not automatically show those added contacts to screen, you need to refresh the window in some way, like clicking on a different customer and then back on the customer you were on before.
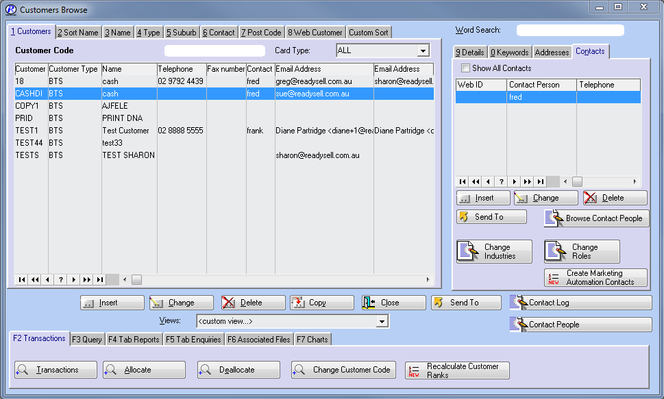
The contacts tab is now populated with the details of the contact level/s you chose.
In the Contacts tab to the right, contact person Fred has been added in this example.
Select this contact and click on button Change on the contacts tab

Tab 1 General has been populated with the phone numbers and Job Description
Only use the flag for Opt Out Of Automated Marketing and remove the note on tab 2 Notes if this contact is never to be updated from the customer file from this process
There is a flag for Opt Out Of Automated Marketing, so that if a contact has been added and you do not want them included in the marketing for whatever reason, click on this check box to flag it.
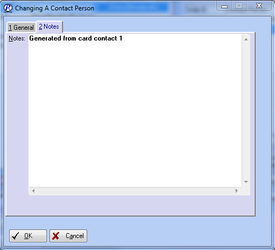
Tab 2 Notes shows which contact level from the customer this contact came from.
If you decide to undo the population of contacts process, this note is what is used to determine which contacts came from the customer cards. If you remove this note, when you select to undo the population process, it will ignore any contacts that do not have this note in it.

Click on button Contact People

The Contact People Browse opens and shows you a list of all contacts for just one customer.
Turn the flag on (top right hand corner) for Show All Contacts For All Customers
All contacts for all customers that exist in the contacts section (right hand side of the customer browse window) now show to screen and you can work on them from this screen by using the Change button and making adjustments accordingly on a contact by contact basis.
Use the flag for Opt Out Of Automated Marketing for each relevant contact to stop those particular flagged contacts from going to Office Brands for the automated marketing. (appears when you have clicked on button change on a contact)
You can use the Send To button to output this list for review to Excel.
All contacts in this list will be sent to Office Brands head office every Sunday and Tuesday night automatically.
Questions
What happens if I update one of the contacts in a customer card?
Answer: The system will be set so that if you update a contact inside the customer details, it will automatically update the contacts on the right hand side of the Customer Browse in the Contacts area.
What happens when I create a new customer?
Answer: You need to click on the button Create Marketing Automation Contacts, select the level/s you are using and click on OK. This will only then update what is new to the contacts area.