Electronic Data Interchange (EDI)
Overview
Electronic Data Interchange (EDI) is a means of transferring data between organizations by electronic means. Readysell has an EDI implementation that allows customers to transfer the following types of data to/from select suppliers:
- Purchase Orders
- Purchase Order Acknowledgements/Electronic Receipts (Not available for Pelikan Artline)
EDI makes the process of placing orders and entering receipts automatic and seamless, allowing for gains in efficiency at both the customer and the supplier side.
Readysell EDI is based on the proved RObI platform and is available for any Readysell customer. If you would like to learn about which of your suppliers support Readysell EDI, please contact our office.
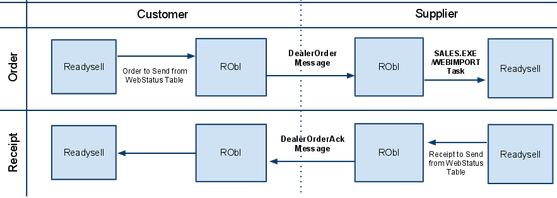
Purchase Receipts Supplier Purchase Orders Customer
Basic Concepts
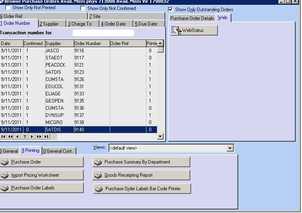
WebSphere Interface Tab
Customers who are using RObI should already be familiar with the WebSphere Interface Tab on Readysell. Because Readysell EDI is built on the RObI platform, this tab will also show orders and receipts being sent to/from suppliers.
For those unfamiliar, on the Readysell main menu you will see a "Web Sphere Interface" tab. If you click this tab you should see a list of the most recent messages sent and received by RObI. These include successful messages as well as any errors or warnings.

This information is primarily for the purpose of Readysell support, however you may also view this tab for information about recent interactions between Readysell customer and supplier systems.
EDI Business Rules
Because customer and supplier systems may not always have their data perfectly aligned, Readysell EDI operates on a number of business rules to reduce the incidences where manual intervention is required. Readysell EDI will also attempt to auto-correct certain data based on any manual intervention that is required to avoid requiring the same intervention for future orders.
Product Matching
When a customer places an order with a supplier over EDI, the customer's system sends across the
following fields: Product Code Product Supplier Code Product Supplier Barcode !worddavff7b7950ce484811898a3acbfd8c34e9.png|height=296,width=463!If the product supplier code is blank for the supplier being ordered from, the default supplier code will be used instead (the default supplier is the one set in the "Supplier" field). If the default supplier code is blank, then the product code will be sent.
Readysell EDI will then try to match to a product in the supplier's system based on the following (in the order specified):
- Exact match of customer "Product Supplier Code" to supplier "Product Code"
- Exact match of customer "Product Supplier Code" to supplier "Product Supplier Code"
To avoid errors, if more than one product is found (for example multiple supplier's using the same code) the match will be ignored.
- Exact match of customer "Product Code" to supplier "Mnemonic Code" (for EzyCode)
- Exact match of customer "Supplier Barcode" to supplier "Supplier Barcode"
- Exact match of customer "Product Supplier Code" to supplier "Mnemonic Code"
- Exact match of customer "Product Supplier Code" to supplier "Previous Product Code"
- Exact match of customer "Product Supplier Code" to supplier "Alternate Code"
Product Correction
Note: This feature is not currently available for Pelikan Artline EDI.
If a product match cannot be found based on any of the rules above, the product will appear with the code "SPECIAL" in the supplier's system. The original product description will remain in the name field and the product code will be available for reference in the line notes field.
The supplier will have to correct the missing product by replacing the "SPECIAL" code with their own product code. When the EDI order acknowledgement is sent back to the customer system, Readysell EDI will automatically correct the product supplier code automatically. This will only affect the product supplier record for the supplier for which the order was placed; no other supplier records will be changed. If no supplier record exists for the product supplier, then one will be created.
Replacements and Substitutions
Note: This feature is not currently available for Pelikan Artline EDI.
If any products are added to the order at the supplier end, these products will be added to the bottom of the purchase receipt at the customer side.
Workflow
Sending Purchase Orders (Readysell EDI)
1. Customers should create a Purchase Order in Readysell as usual.
2. When the order is entered, the print functionality should be used as if the order as usual. 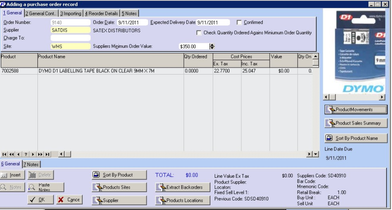
- If the supplier is enabled for EDI, a popup window will appear asking whether the order should be sent via EDI.
!worddav1bc9504c90482e6a953f8e657b068147.png|height=117,width=200!The functionality has been purposefully inserted into the print function to avoid having to retrain users and to prompt users to use EDI rather than manually printing/faxing orders to EDI enabled suppliers.
- At this stage, the user may opt to skip sending via EDI (for example if they just wanted to print and review the order). They may then make changes and choose to send the order using the same process later.
To test this process you can enter any information into the "EDI Endpoint URL" field on a supplier record. This will allow you to perform the steps above without having to activate the EDI feature permanently. Once you have completed your testing, remove the data out of the "EDI Endpoint URL" field.
Sending Purchase Orders (Pelikan Artline EDI)
1. Customers should create a Purchase Order in Readysell as usual.
2. When the order is entered, the print functionality should be used as if the order as usual.
- If the supplier is enabled for EDI, a popup window will appear asking whether the order should be sent via EDI.
!worddav1bc9504c90482e6a953f8e657b068147.png|height=117,width=200!The functionality has been purposefully inserted into the print function to avoid having to retrain users and to prompt users to use EDI rather than manually printing/faxing orders to EDI enabled suppliers.
- At this stage, the user may opt to skip sending via EDI (for example if they just wanted to print and review the order). They may then make changes and choose to send the order using the same process later.
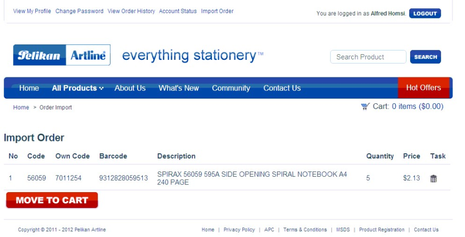
- The order will pop up on your screen, pre-populated into the Pelikan Artline website. If there are any issues, you have 2 choices:
- correct the order on the screen
- cancel out and correct the order in your system, then regenerate the EDI order
- If you are making corrections on the screen, you may need to address the following types of issues:
- Incorrect Quantities
- Enter the correct quantity and click the "Save" icon
- Incorrect Pricing
- To accept the corrected price, click the "Save" icon
- Invalid or Missing Product Codes
- Use the "Search Product" feature to find the correct product.
- Incorrect Quantities
Tip: This is a good time to update the supplier code in your system so that you don't run into the same issue next time.
7. Once all of your corrections have been made, click "Move to Cart" 
8. A Message appears confirming the move to the shopping cart, click "OK"
9. Your order will be moved to the shopping cart. When you are ready, click "Checkout". 

- Confirm your order and click "Submit"
- You will receive an email confirmation from Pelikan Artline for your order.
Receiving Purchase Receipts
Note: This feature is not currently available for Pelikan Artline EDI.
Once the supplier has processed the EDI order and voiced the customer, a purchase order acknowledgement will be sent to the customer system. This will appear as a regular "Purchase Receipt" in the customer system.
The receipt will contain the products and quantity that the supplier will be sending and will automatically correct any incorrect products on the order (as per the business rules section).
This receipt should be processed in the same way as any other purchase receipt.
Technical Aspects
Architectural Overview
RObI Platform
RObI runs as an ASP.NET application on top of a Microsoft Internet Information Server (IIS). RObI has been tested on Windows XP, Windows Vista, Windows 7, Windows Server 2003 (including R2) and Windows Server 2008 (including R2).
RObI Web Interface
If you access http://SERVER_HOSTNAME:8092/ from the internal network (and log in using the server's Administrator username/password) you will be presented with the following screen.
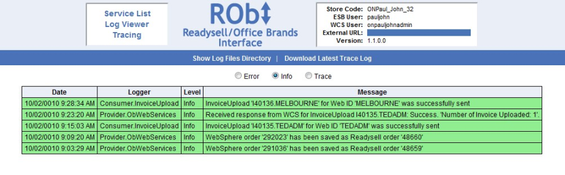
This is the RObI web interface and will provide you with access to the following features:
- Service List
- list of the accessible web service triggers and providers of RObI.
- Log Viewer
- real-time viewer for the RObI log file as well as access to the log files directory. This directory contains the log files for the last 30 days as well as all of the XML messages sent and received by RObI.
RObI Configuration
RObI is configured in two places.
- Readysell System References
RObI pulls various configuration data from the Readysell system reference table. The bulk of the configuration pertinant to RObI can be found under the "WEB" system type.
- Web.config
The ASP.NET web configuration file contains a number of configuration variables required for RObI. A description of the function of most of these flags can be found in this user guide. This file also contains the "Installation Path" and flags to turn on and off each of the integration features.
Installation
Readysell EDI installation must be handled by a Readysell staff member. Please contact our support team for assistance.
Supplier System
- Go to System References and set Description of the following to True
- Type: WEB, Reference: DEALERORD-IN-ENABLE
- Type: WEB, Reference: DEALERORDACK-OUT-ENABLE
- For each customer:
- Place the customer's username/password into their Customer record as the EDI
Username and EDI Password
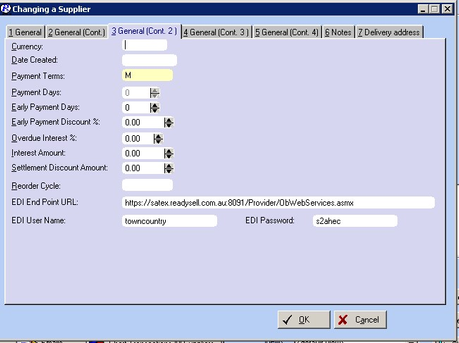
- Enter the customer's EDI Endpoint URL into the relevant field
Customer System
- Go to System References and set Description of the following to True
- Type: WEB, Reference: DEALERORD-OUT-ENABLE
- Type: WEB, Reference: DEALERORDACK-IN-ENABLE
- For each supplier:
- Place the customer's username/password into their Supplier record as the EDI
Username and EDI Password
- Enter the supplier's EDI Endpoint URL into the relevant field. For Pelikan Artline, this should always be _https://www.pelikanartline.com.au/api_upload.php_